Posts tagged recipes

Heston’s Bacon and Egg Ice Cream

IMG_0460

In the spirit of Fathers’ Day being just round the corner, and in support of dude food, I decided to try Heston Blumenthal’s Bacon and Egg Ice Cream. This recipe is an absolute crackup – you should really watch the faces of people who first try this – and it’s so amazingly easy to carry out.

This smooth rich ice cream actually tastes intensely of bacon and egg, and the custard is actually more delicious than the ice cream. But I’m getting ahead of myself.

So let’s just get stuck into the recipe:

Heston’s Bacon and Egg Ice Cream:

500ml full cream milk
Good quality bacon
12 egg yolks
60g sugar

So first the bacon. Pop it under the grill till it’s all nice and golden and delicious – try not to eat it all! – and put it into a pot.

IMG_0429

I gave it a quick chop, but you don’t really have to. Also, the amount of bacon used does affect how strong the bacon flavour is. I used about 2 rashers because I figured that it would be infusing overnight, so I could afford to use a little less.

Add your milk to your bacon, then bring to the boil

IMG_0431

This just helps to get those flavours mingling. At this point, your milk will start to look a little pink. Then pour it all into a container and leave it in the fridge overnight.

IMG_0433

Now you don’t want anyone to drink or throw away your funky concoction, so LABEL THE DANG THING!!

Bring your milk back up to the boil, then strain it. In a separate bowl, whisk together 12 egg yolks with 60g of sugar.

IMG_0434

Why so many egg yolks? Well, while the custard would still work with less egg yolks, you want the eggy-ness to come across. It is a bacon and egg ice cream after all. So you achieve that by adding more egg yolks. And the whites don’t have to go to waste either! Simply give them a good whisk and use them to flavour some nuts!

Then stream your hot milk into the egg yolks while whisking, then return the mixture to a clean pan. Cook, cover low heat, until the mixture is thick enough to coat the back of a spoon. For the nerdy cooks, you can take this custard to about 80C before it starts curdling. If you do intend to take it to 80C, then prepare a bowl set over another bowl with ice to stop the cooking process. Otherwise, take it to a little less and pour it into another bowl.

Then chill the whole mixture – this helps it freeze faster and prevents large ice crystals which can make your ice cream ‘crunchy’ – and then churn according to your ice cream manufacturer’s instructions.
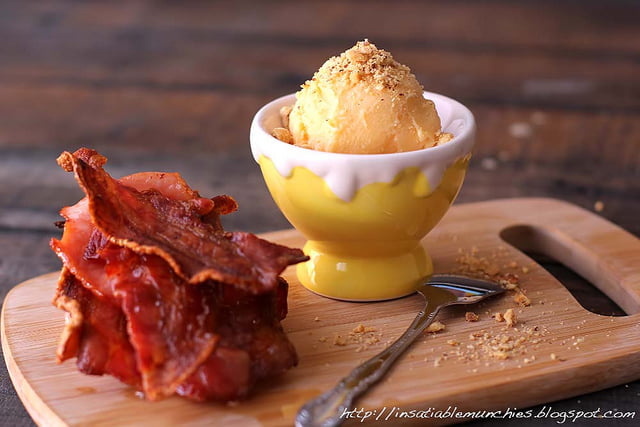
The result?

IMG_0462

A rich creamy ice cream that tastes of exactly what it’s meant to be – bacon and eggs. Personally, I thought the custard tasted wayyy more intense than the ice cream, so before you start dialling down on the flavour, try the finished product first.

To serve, Heston does this funky thing with using dry ice and a mixer, where the ice cream turns out look like scrambled eggs. You can totally do that too, but I’m short one mixer at the moment. I just topped my ice cream with toasted bread crumbs and some crispy bacon on the side.

Bet dad will get a kick out of this!

Spiced Nuts

IMG_0440

With Father’s Day just round the corner, I’m sure everyone’s racking their brains to figure out just how to spoil dad. Well, if your dad loves flavoured nuts, I’ve got a really simple recipe here for you.

When I first had this idea, I went trawling through the net for spiced nuts recipes, but all of them seem to just dust roasted nuts with spices. But what about that gnarly crispy coating that you get with store bought nuts?

Well, the secret? Egg whites.

IMG_0435

I learnt a recipe for almond biscuits that use just lightly whipped egg whites with icing sugar and slivered almonds, and it gave the exact texture that I wanted for my nuts.

Cayenne Spiced Nuts:

1 large egg white
350g raw cashews (or any nuts you like)
3 teaspoons of cayenne pepper
1 tsp of paprika
2 tsp salt (or smoked salt if you can get your hands on it)
2 tsp icing sugar

Preheat the oven to 180C. Simply whip up the egg whites to soft peaks, then stir in all the seasoning. Coat the nuts in the mixture, then spread onto a baking paper lined cookie sheet in a single layer. Bake till golden brown, then let cool. Break up the nuts – it would have baked into one single sheet – and if things aren’t as crispy, you can dry it out a little in a low (150C) oven.

Then simply pop into a jar/airtight container/cellophane bags and serve it up to Dad with his favourite whisky on the rocks/beer/beverage of choice!

IMG_0437 
This super simple recipe means that you can make a whole ton of variations – anything from sweet vanilla almonds, to peri peri peanuts…the sky’s the limit. As long as you can mix it into the egg white mixture, you’re good to go. Just remember that the flavour can get a little muted, so if you find that it’s not quite as strong as you’d like it, just scatter more flavouring over the top while its still warm, and just mix it in once it’s cooled. 

Kotlet Burger

I have a new found enjoyment of Persian food. The rice, the stews, the liberal use of turmeric…it all culminates in a beautifully delicious end product that speaks of decades of recipe refinement.

There is one particular recipe that ingeniously uses potatoes, mince, onion and spices to make little patties that are delicious over rice, with a fresh tangy side salad. Kotlets – which to me sound like cutlets – seem like a great way to stretch out the meat supply. I can’t actually find any history on these delicious morsels, but most Persians that I speak to recall these as their childhood favourite.

Read More

What I Ate: Twice Cooked Pork Belly Braise

Here’s the thing with two-person households. You read a recipe that you like, often written for four or six, and then you make it, only to find that even though the both of you are stuffed, there’s still plenty of leftover to go around. Sure, you can halve the recipe, but sometimes that really affects cooking times, and I find it easier just to try and do something interesting with the leftovers!

So if you’ve tried my Slow Roasted Pork Belly recipe and you have leftovers – like I did – here’s something that you can try with them!

Read More

Slow Roasted Pork Belly

IMG_0201

Crackling. I haven’t met anyone who doesn’t like good, crispy crackling. And it’s actually easier to achieve than you would expect. Impressive, because it tastes great and because you have to do a ridiculously small amount of work.

IMG_0207

Slow Roasted Pork Belly

600g slab of pork belly
Oil
Salt
Pepper

Preheat your oven to 160C (not fan forced. If you’re can’t turn off the fan, I would suggest 140-150C).

Score the pork belly to what your portions would be. I would suggest using a very small paring knife if you have one – you want to score just into the fat but not cut the meat. Rub a little bit of oil – I used just enough for a light coating – onto the pork belly, followed by a generous rub of salt and pepper, making sure you get into the creases. I scattered stripes of flavoured salt from Smoke and Roast that I got from The Good Food and Wine Show, and it gave me interesting bursts of flavour in every piece!

Simply roast it over a rack for a couple of hours till the rind is nice, puffed and crispy. I tend not to worry too much about the pork cooking through – at those sort of temperatures the pork is always done by the time the crackling is. If you have a much larger slab of pork, I would suggest cutting it into smaller slabs before you put it into the oven.

It’s the most foolproof recipe for pork and pork crackling I’ve ever used. Simple and effective, I like to serve portions of the pork just with some roasted veggies, no gravy required!

What’s your favourite tips to making great pork belly with amazing crackling?

Ricotta Pancakes with Blueberry Compote and Vanilla Cream

Lazy Sunday mornings. Rain pattering softly against the glass of the window. You know what you need for breakfast? Pancakes.

Pancakes are actually very simple things to make. It can be as involved or as easy as you want. Now, I like a certain texture to my pancakes (fluffy) and there are a couple more steps than just mix wet and dry. But let me assure you, the results are completely worth it.
Read More

What I ate: Shredded lamb pasta

IMG_0107

So I had a satisfying roasted lamb over the weekend, but seeing as how I roasted a whole 2+kg lamb shoulder, I was bound to have leftovers. Well, waste not want not, and I think this is a fantastic way to use up those bits of lamb left in your fridge.

For space, I shredded the lamb after the roast had cooled and store it away in an airtight container in the fridge. So for a quick lunch (or weeknight dinner) I just took that pasta and added it to:

  • Cooked pasta (just boil it to just under al dente)
  • Sliced black olives
  • Semi dried tomatoes, roughly chopped
  • Feta
  • Lemon juice

It was just a matter of warming the lamb in a pat of butter, adding the hot, freshly cooked pasta over the top, then throwing in the tomatoes and olives to warm through, and then top with feta. A squeeze of lemon juice over the top, and off you go.

Feel free to add any other bits and pieces you have in your fridge – I just needed some acidity to cut through the lamb, so I think that other types of antipasto will do: roasted capsicum, charred eggplant, marinated feta…the list goes on.

IMG_0105

What are your favourite ways to use up meat leftover from a roast?

Roasted.

IMG_0092

Sometimes I look at winter dishes – slow roasts, stews, braises etc – and wonder: is this people’s way of keeping a heat source going as long as possible so the house is warm too? I know that I relish a slow roast during winter because my oven ends up heating the entire apartment, eliminating my need for an extra heater.

This slow roasted lamb shoulder is a pretty easy and versatile recipe, and the roasted vegetables that accompany it are some of my favourite roast vegetable recipes ever, and I would eat them all on their own, without the meat. It’s a surprisingly rich meal, great when it’s freezing outside, and nothing says Sunday family lunch like a roast.

Slow roasted lamb shoulder
1 lamb shoulder ( this feeds about 6 people, by my estimation)
Lemon
Spice of choice (fennel, cumin, rosemary…I used fennel in this case)
Garlic

Lightly rub the lamb with oil and squeeze some lemon juice over. Add your spice of choice, and the moisture will help it stick. Marinate in the fridge overnight.

Preheat your oven to 160C. Put the shoulder in a roasting pan with unpeeled cloves of garlic, and rub with salt and pepper. Cover with foil and roast for 3 hrs. Then uncover and roast at 180C for another 20min.

IMG_0079

Roasted Cauliflower

This recipe I adapted from Darya Rose, and it’s actually really darn good. My favourite way to eating cauliflower to date.

1 head of cauliflower
Olive oil
Salt
1/2 tsp curry powder
1/2 tsp sweet paprika
1/2 tsp cayenne pepper

Simply break up the cauliflower into florets, place in a pan with the rest of the ingredients – I added some lamb fat from trimming the lamb to add some extra flavour – and cover. Place in the oven, preferably 180C, but if you’re putting it in with the lamb, just leave it in for a little longer, it’ll get there. Once the cauliflower gets slightly translucent (about 20min), take the foil off, and let it brown and crisp up slightly.

Roasted Pumpkin

Pumpkin
Garlic
Olive oil

Cut the pumpkin into 1 cm dice. Toss with olive oil, salt and pepper. Add some crushed garlic cloves to the pan and roast till tender and slightly browned.

Roasted Brussel Sprouts

You can find my easy recipe for roasted brussel sprouts here.

IMG_0083

And that’s it, really. I had four pans going in the oven at once, and then just made a quick gravy to serve with some butter, flour, worchestershire, beef stock, and cream. Or just use your favourite gravy recipe.

It may seem a little involved, but I think that it’s fantastic for a family lunch because it just takes a tiny bit of preparation, and then you’re simply enjoying the company of your family and friends while the oven does all the work for you. A hearty roast over the weekend, what more could I ask for?

What I ate: Squid ink pasta and crabmeat aglio e olio

IMG_0078

Sometimes, you just want a light lunch. Sometimes it’s nice to pretend that it’s still spring and immerse yourself in punchy fresh flavours that make you forget that you had to drag yourself out of the warm cocoon that is your bed to face the day.

As much as I love long stews and slow cooking during the cold dreary days of winter, sometimes I feel like it doesn’t even feel like winter yet. Not that I’m complaining, but sometimes I feel a little weirded out when I see the sun out, and can walk to the shops in my t-shirt and shorts. But the upside is that the sun just calls for light meals and a cold glass of crisp white wine.

And that’s where this recipe came in. I had some squid ink pasta that had to get used, and my pantry is always stocked with chilli and garlic. In this case, I used tinned alaskan crab meat, but crab meat is available in tubs at the supermarket, or feel free to use bacon or pancetta if you’d like. I know it’s not an Aglio e olio in the strictest sense, but it’s time to clear out my cupboards and it’s extremely tasty and so simple.

Here’s what I used:

Squid ink pasta
Garlic (1 clove per entree size portion, and I love my garlic.)
Bird’s eye chilli (1 chilli per clove of garlic, but feel free to use more)
Extra virgin olive oil (a nice fruity one)
Fish stock
1 tin alaskan crab meat
Coriander
Yuzu juice

I par boiled the pasta first in salted boiling water, then finished it in a little bit of fish stock.

IMG_0068

TENTACLES OF THE SEA!!!!

I find that finishing the last 2 minutes or so in fish stock gives it just a little bit more flavour, but you can just finish boiling the pasta in salted boiling water. Just remember that because you’re cooking it a bit further with the garlic and chilli, haven the pasta slightly underdone, so that by the time the garlic is cooked, your pasta is perfectly al dente.

While the pasta is boiling, I smashed the garlic and chilli through a mortar and pestle with some cracked black pepper and salt.

I moved the pasta from the pot into my sauté pan with a splash of fish stock, and simmered it till the stock is completely absorbed. Half a cup was all I had to use for 2 entree sized portions, but add a splash more if it isn’t enough. Then simply add the garlic paste and olive oil to the pasta, gently sauté it till the garlic loses the acrid burn, then stir through the crab meat, yuzu juice and a smidgen more oil. Scatter with some coriander to finish,

Curiously addictive and easy, this makes for a light lunch, or a simple weeknight dinner. Don’t like crab? Well it works with all sorts of meats, herbs (use parsley if you don’t like coriander), and because it’s so basic, it’s open to your wildest imaginations.

What I ate: Miso glazed eggplant

IMG_9951

Eggplants seem to be everywhere lately, and I love how a simple glaze can transform the humble eggplant into Nasu Dengaku. The miso glaze is dead easy.
Just combine:

1 tbsp mirin
2 tbsp shiro miso (white miso)
2 tbsp sugar
1/2 tsp sesame oil
1-2 tbsp water, to thin it out

I grilled my eggplants in the oven, set to 200C, but you can also do it on the stove. I first sliced my eggplant into thick pieces and lightly salted them. When beads of moisture appeared, I patted dry with a paper towel, then sprayed them with oil and popped them under the grill. When they’re a light brown, I just brushed them with the glaze and put them back under to finish off.

So simple, and tasty. I have it on rice as a light lunch, but you can definitely also have it as part of a larger meal.

What’s your favourite eggplant recipe?