Date Archives November 2012

Curry Favour

IMG_9076

We take the spicy route through asia, then through to spain, and end up stalking our food. This week we talk about Jackie M’s Malaysian cooking masterclass, Mo Vida in Melbourne, and Truckr – a great way to stalk food trucks.

Download the audio file here (3MB, 6:06), or subscribe to the podcast on iTunes

From the Frypan – Sedap! (00:23)

In From the Frypan, we whip up an authentic and tasty Beef Rendang. I learnt the secrets to malaysian cooking from Jackie M herself, in a Malaysian cooking masterclass.

Waka Waka – Tale as old as time.. (02:49)

For Waka Waka this week we have a disappointing experience at Beauty at the Beast, but a marvelous one at Mo Vida in Melbourne! The Seafood pasta at Mo Vida is EPIC! Just sayin’.

From the Ice Box – Appsolutely Fab! (05:08)

Technology helps us in so many ways, and this week it helps us hunt down those food trucks!

What’s your favourite way to get the latest food truck news?

Queen Make-At-Home Gelato Kits, Part 2

layout 2

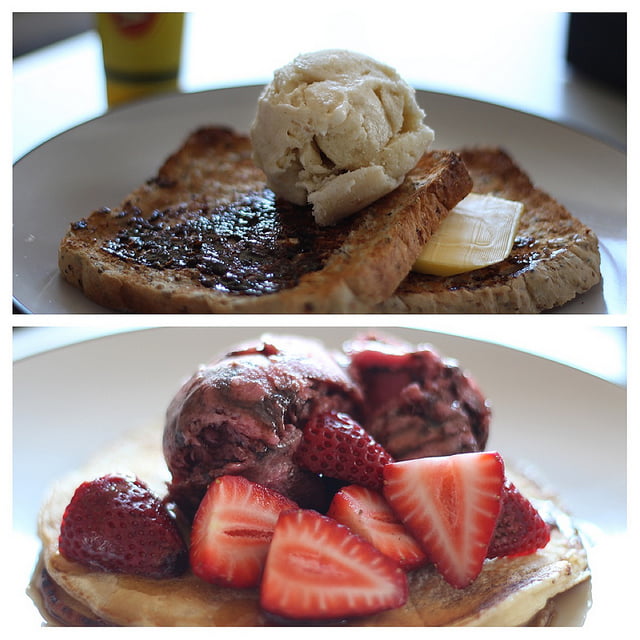
From top: Vanilla and Vegemite, Strawberry and Balsamic Glaze swirl

I was recently sent 4 flavours of Make at Home Gelato Kits from the lovely people from Beyond the Square Communications and Queen Fine Foods. But rather than have the usual – straight vanilla, strawberry, chocolate and lemon – I wanted to do something special, something interesting.

To get inspiration for what I wanted to do with the strawberry gelato, I got a punnet of ruby red strawberries – I’m so happy that they’re in season now – and thought about what I’d usually eat with them. Then it clicked. Balsamic Glaze. I absolutely adore strawberries macerated in balsamic vinegar and a sprinkle of sugar, and a glaze would swirl gorgeously into the strawberry gelato.

Reducing the Vinegar

The balsamic glaze is dead simple to make. Simply heat up a cup or so of balsamic vinegar – this is going to reduce by about half, so just double the quantity of however much glaze you’d like to make – until it’s reduced almost to half, then add about a third of a cup of densely packed brown sugar. Continue heating – making sure that the mixture does not burn – until you reach a thick, syrupy consistency.

Strawberries with Balsamic Glaze

And there you go, a dead simple balsamic glaze to add to your strawberry gelato.

Making the gelato was also really easy:

Instructions

I loved the little pictures that came on the back of the box, and it simply involved whisking in your liquid of choice – in this case it could be milk for a gelato or water for a sorbet – and churning it in your ice cream machine of choice.

Whisked away

Ice Cream Churner

It’s a really good idea to make space in your freezer to chill the mixture slightly before churning, just because the little churners with the insulated bowls aren’t always the best at bringing your ice cream all the way. After about 35 min of churning (the machine manufacturers recommend 40 min max) I ended up with this:

Strawberry Gelato

It was slightly thicker than when I first started, but not by much. It provided me just enough thickness to swirl the glaze through, but if I wanted to put anything thicker through, it simply would not have held. As mentioned in the previous post, DO NOT place the ice cream mixture in the churning bowl and leave it to chill in the freezer. The mixture will start freezing solid and you’ll have a real issue getting the paddle of the churner to turn properly. Place the mixture in a bowl and into the freezer for about 20 minutes. Then churn it according to the machine’s instructions.

When you’re done, simply pour it into your freezing container of choice – mine was a one litre capacity plastic container – and swirl the glaze through.

Strawberry Gelato

Then simply cover the ice cream in cling wrap, ensuring that the cling wrap touches all the surface of the ice cream and that there aren’t any air bubbles, put on the lid, and then into the freezer to freeze the rest of the way. The reason that the cling is so important is that the freezer actually dehydrates your food by having the water in your food freeze into ice crystals on the surface, ruining the texture, and causing you to have ‘crunchy’ ice cream.

It also makes your ice cream look like a funky marble watercolour. =)

After leaving it sets in the freezer, simply serve on pancakes with some fresh strawberries, or dig into it with your favourite ice cream topping.

Balmy Strawberries

Only the Vanilla was left, and in my search for interesting sweet/savoury combos I decided to make a leap and try Vanilla and Vegemite. It’s dead simple – after churning the vanilla ice cream, simply swirl in the vegemite. I used vegemite from a squeeze bottle just to make things simpler.

V for Vanilla

I think it’s one of my favourites – the salty, umami flavour of the vegemite complemented the creamy sweetness of the vanilla bean gelato perfectly. Very addictive.

This is absolutely a great easy way to make your own flavour combinations without having to worry about making the ice cream custard etc. Yes, it’s not as flexible as infusing the custard with really cool flavours (I’d love to make a savoury ice cream next with garlic infused cream) but it’s also something easy and creative that you can make on a week night to treat yourself on the weekend.

I’m still treating myself to that rich chocolate gelato. I love salted butterscotch. That is all. Yum.

Note: Tammi Kwok of Insatiable Munchies was given Queen Make At Home gelato kits by the nice people at Queen Fine Foods and Beyond the Square Communications.

Hainanese Chicken Rice

Hainanese chicken rice seems to have had a legendary status in Singapore. Every single person that I’ve met who is planning a trip to Singapore, all talk about that heavenly fragrant rice with smooth, succulent chicken. Coming from Singapore, I must admit that I am extremely fond of the dish myself. Back home, a place of rice and chicken can cost you as little as $3, and it’s quick, simple, and delicious. While I wouldn’t say that it’s a quintessential Singaporean dish, it is definitely something that I miss and that reminds me of home.
Read More

Queen Make-At-Home Gelato Kits, Part 1

Layout 1

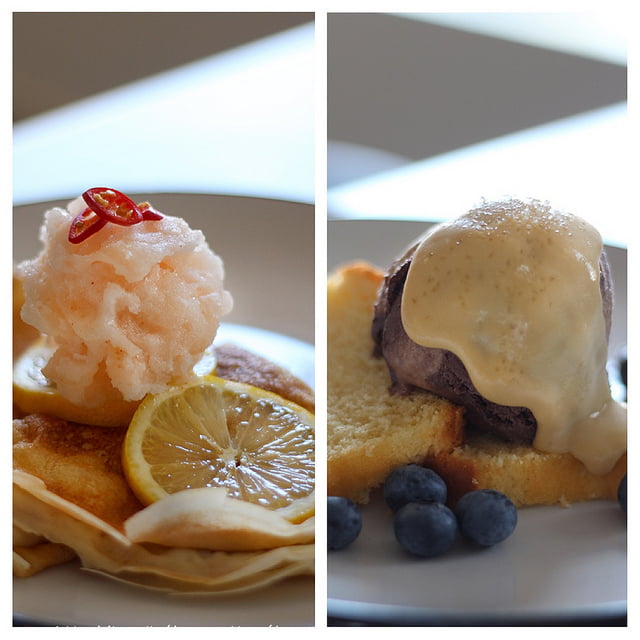
From left: Lemon and Chilli Sorbet, Chocolate Gelato with salted butterscotch sauce

I absolutely LOVE receiving things in the mail, and this time it’s Queen Make-At-Home gelato kits!!

IMG_8756

Summer has rolled around in a BIG way, and that’s just put me in the mood for ice cream – meaning that these kits have come at the perfect time. I received 3 gelato kits and 1 sorbet, and I wanted very much to do something special with them. I know that being someone who constantly craves variety and surprise, I simply could not just have your run of the mill gelato flavours. But what to make?

Well, the lemon was the easiest to figure out. Something that I absolutely love with my acid, is the burn of chilli. I just love how the citric acid in lemon makes my tastebuds ring like the bells of Notre Dame, and then the capsacin in the chilli just blaze right through, setting them all on fire. Of course, I didn’t want my gelato to make people reach for a glass of water, but I did want it to bite back. And so…

Fire and Ice

Fire and Ice Sorbet

It was simple, really. Lemon sorbet churned with just a touch of good chilli jam. Is there anything more simple? The sorbet turned out refreshing, and yet tantalising at the same time! We had it topped off on lemon-juice-and-maple-syrup-soaked crepes. Because the chilli jam wasn’t knock-your-socks-off spicy, it provided a slight warmth in my throat following the first tang of refreshing lemon. A match made in heaven.

The chocolate gelato was just slightly harder to pair. I wanted something that wasn’t too traditional, but it was a little harder to match unconventional ingredients to a chocolate gelato – in my opinion – as the rich, luxurious texture and deep flavour of the chocolate will just dominate. Yes, it can definitely be argued that there are many different things that can be done with chocolate, but I think that chocolate gelato is a very different beast. You’re not just dealing with the texture, flavour and mouth feel of pure chocolate, but also of the frozen creaminess of the gelato. (And I already used the chilli idea for the lemon.)

But thinking about the creamy texture and luxurious flavour made me think, “Why not just push luxuriousness and decadence to the next level? Surely more of a good thing can’t be bad?”

The answer? Salted butterscotch sauce.

Butterscotch Cocoa

Butterscotch is a relatively simple thing to make. Supposedly you’re meant to use actual scotch in it, but I don’t happen to have it around the home. The recipe seems to work well enough, and can be used to top off any number of desserts.

Salted Butterscotch Sauce

125g Butter
1/2 cup Brown Sugar
1/4 cup cream
Coarse Salt/Sea Salt Flakes

In a shallow pan, melt the butter and whisk in the brown sugar. Once the mixture has come to a boil, add the cream in slowly and whisk to combine. Continue to cook the sauce over low heat until the sauce thickens slightly. Sauce will continue to thicken upon standing. Once cooled, fold in sea salt flakes, careful not to let them fully dissolve into the sauce. Alternatively, sprinkle the salt on just before serving.

I would strongly recommend a small serving of the ice cream and sauce. I’m a person who loves any amount of decadence and hedonism, but even I felt that this was a truly rich combination. Immensely satisfying in small amounts. And given that it’s so easy to make, you can have frozen desserts to last you through those 40C days to come!

What I really like about these kits are that they are so simple, and allow you to concentrate on adding your spin on it without having to worry about things like infusing a particular flavour into the ice cream custard. These flavours are just so basic that you can add any multitude of things to it, and just create your own!

Of course, with great creativity still comes things to look out for, and these are my top things to look out for when making these gelatos:

  • Make sure that you add the liquid component slowly and in parts, whisking to combine before adding the rest. If you add all of the liquid at once, it can be hard to ensure that all the powder dissolves into the liquid to make a homogenous mixture, resulting in a wonky textured ice cream. 
  • Anything that you wish to churn into the ice cream should be somewhat fluid but still of a syrupy consistency. When I added the chilli jam to the first batch of ice cream, I added it straight out of the jar and all the jam just sunk to the bottom. Heating it gently and then allowing it to cool to room temperature helped to ensure that it would mix into the lemon sorbet entirely.
  • If you want to swirl the butterscotch sauce into the gelato, you can, but make sure that the gelato has churned to a thick enough consistency, or the sauce will settle eventually into the bottom of the container.
  • In the pre-cooling process before churning, DO NOT put the gelato straight into the insulated bowl of the churner and put that in the fridge. You will end up with rapidly frozen edges that will cause the paddle of the machine to not turn and following that, very disturbing noises from your ice cream machine.
  • That being said, the pre-cooling process of putting the mixture in the freezer for 20 minutes really helps you get the thick ice cream consistency when you put it into the machine to churn. Otherwise, at the end of 40 minutes of churning you get a semi-frozen tasty soup and is wayyy too thin to swirl flavours through.

But the best part is that these mixtures are so forgiving. You don’t have to worry about overcooking or curdling a custard. Even when I wasn’t able to make a completely homogenised gelato/sorbet mix – I was too eager and put all the liquid component in at once – the gelato still froze to a creamy consistency and was delicious nonetheless.

What are your favourite delicious gelato combinations?

Note: Tammi Kwok of Insatiable Munchies was given Queen Make At Home gelato kits by the nice people at Queen Fine Foods and Beyond the Square Communications.

Spain, Japan and..Toothpaste?

around the world

Picture from rachfrog

This week we take a culinary tour moving from Spain, to Japan and end up in the lab, talking about all things geeky. We chat about a tapas inspired dinner, the new Japanese self-serve joint Hana Hana, and air fryers. We also ask the question: Why does orange juice taste so crap after you brush your teeth?

Download the audio file here (9.9MB, 20:02), or subscribe to the podcast on iTunes

From the Frypan – Hola! (1:33)

From the Frypan is where we talk about what we’ve got up to in the kitchen. This week it’s a fiery discussion about a tapas inspired dinner.

Waka Waka – A name so nice you gotta say it twice! (9:46)

This one’s for all the gluttons! This week we review Japanese noodle bar Hana Hana, which translates to “Flower Flower”.

From the Ice Box – Look Jack, I’m flying! (12:59)

We like the geeky and the crazy, especially when we talk about food. This week we talk about the air frying. If you combine the two words, does that make it flying? We also discuss why liquid nitrogen ice cream is amazing!

And don’t forget the Trivia of the Week. Why does orange juice taste bad after you brush your teeth?

Gobble Gobble!

Hello Mr Bird

“What happened when the turkey got into a fight?
He got the stuffing knocked out of him!”

I have finally done it – I have actually roasted a turkey.

A turkey to me was always what seemed like the standing symbol of the American holidays. I always envisioned a family, sitting around the table, clad in tacky wool knit jumpers, and a MASSIVE HULKING turkey in the middle of the room. They would get loud and just a little tipsy, and start singing carols as it began to snow outside. That scene was what I would envision every time someone mentioned the term Christmas holidays.

Well, apparently that’s not confined to America anymore! When I told my friends that I was roasting a turkey, their instant response was, “Yum! Christmas has come early this year!”

Christmas or no Christmas, I have never consumed or cooked a turkey before. Which made this seem like a daunting task, because I didn’t even know what I was aiming for. What do I do with it? Where do I start?

The starting point, it seems, is with a brine. I was told that a brine is the first step to a turkey, and because I love LOVE salting my meats, it seemed a good place to start for me too.

The Brine

Making the brine

All the recipes for brine appear to include salt and sugar as the base, and then using other ingredients to build up the flavour and aromatics from there. The recipe that I used is really an amalgamation of everything that I had read, tweaked for the ingredients in my cupboard.

Turkey Brine:

8L of Water
1 cups of Honey
2 cups of Brown sugar
2 cups of Salt
2 Lemons, halved
2 heads of Garlic, halved to expose cloves
3 or 4 Bay leaves
1 tbsp of Mustard Seeds
bunch of Sage
bunch of Lemon Thyme
bunch of Rosemary

Put everything into a pot – I had to do this in 2 batches – and bring to the boil. Let cool, and put brine into the vessel in which you’d like to brine your turkey.

Unwrap your turkey and pat dry with paper towels. Dunk turkey into brine and leave overnight. Personally, I left it in there for 16 or so hours, turning the turkey halfway through because I didn’t have enough brine to cover the turkey completely.

Brining a turkey in the crisper

The Stuffing

Stuffing in a tin

Stuffing, to me, was just seasoned breadcrumbs there to soak up the juices in the cavity of birds, providing a delicious sort of savoury pudding to be had with the bird. It wasn’t until recently that I found out that stuffing could be a separate entity, and have its own flavours to complement how you decide to season your poultry.

The stuffing recipe I chose was taken off the Ingham website, and was definitely a really good partner to the turkey recipe it accompanied.

Turkey Stuffing

1 large brown onion, diced
3 rashers bacon, rind removed and chopped
8 cups of breadcrumbs
1/2 cup pecan nuts, chopped
1 egg, whisked
2 tbsp fresh thyme leaves
Butter

Sautée the onion and bacon in the melted butter.

Sautéeing onions in butter

If you want, you can also render the fat off the rind that has been removed from the bacon. Then you have little bits of pork crackling to snack on! …Don’t look at me like that, did I say this was a healthy recipe? No. But it’s delicious.

Moving on.

Add all the ingredients into a bowl and mix thoroughly.

A note about the breadcrumbs: I much prefer fresh-ish breadcrumbs as opposed to the dried breadcrumbs that you get from the supermarket as I like the fluffy texture that you get from fresh breadcrumbs when all the juices have been absorbed. But fresh breadcrumbs usually require some bread, and some processing.

Now if you’d like to make fresh breadcrumbs and do not have a food processor, then you have to resort to other unorthodox methods to get them. Initially, the tip I read online about having a frozen loaf of bread and beating it with a rolling pin seemed really interesting.

Making breadcrumbs

However, the bread seemed to thaw wayyy too quickly, and was more likely to turn to mush. So I decided to grate the frozen pieces of bread instead.

And it works! Yes, you’ll end up with some larger pieces that you will have to chop up with a knife, but it’s all still relatively easy and oddly therapeutic.

Also, instead to regular thyme I used lemon thyme, which smells heavenly and looks oh so pretty!

Lemon thyme!

I also made Apple and Raisin stuffing that I put just into loaf tins to bake. You never know when you will run out of stuffing. I just followed this recipe, and adding a splosh more chicken stock because stuffing in a pan will not be able to soak up juices from a roasting bird, and will need more moisture to help it along.


The Roasting

125g butter, softened
1/2 cup pecans, finely chopped
1/2 cup maple syrup

This is the simplest step. Preheat your oven to 180C, and take your turkey out of its brine. I didn’t have that much space to work with, so I sanitised a sink and put the turkey in there. Then, carefully separate the skin off the turkey breast with your fingers, and add a layer of butter. (You may or may not use all the butter, but if you don’t, I had an idea that put it to good use.)

Next, stuff the turkey and truss it well. Place turkey on a rack in a roasting tray, and cover just the breast and the leg ends with foil to prevent them from over browning.

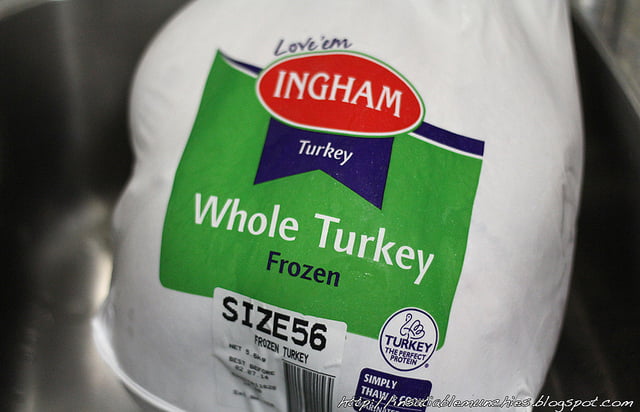
How long you roast your turkey for really depends on the size of turkey that you get. There were instructions on the Ingham turkey, but I had actually forgotten to look at them when I was prepping the turkey to brine. I did, however, find a recipe online that told me that my bird – which was 5 kilos and stuffed – required about 4 ish hours to cook. I then proceeded to cook my bird for 3 and a bit hours, then turned the oven off and let the bird rest in the residual heat of the closed oven for another hour or so while my guests arrived.

Roasted Turkey

I know that I said I’ve never had turkey before, but this was delish! It had a deeper flavour – to me – than chicken, and had a denser texture. The skin was my favourite bit – as you do – and I attribute that to the brining. It had a slightly sweet taste to it and a light aroma that it otherwise might not have had.

Ok, so some bits of the bird browned a little bit more than I wanted it to, but I blame that on using a gas oven where the heat came from the bottom of the oven.

Either way, my dinner guests seemed happy with the result, and I packed the leftover turkey away with the juices from the bottom of the pan. Just so you know, it’s definitely something worth doing, because the turkey seemed to taste SO MUCH MORE AWESOME the next day.

Oh, and that left over maple syrup butter? I squeezed out the garlic cloves from the brine, mashed it up, and sautéed it lightly with some regular butter. Then I added the garlic to the maple syrup butter and BAM! One of the more amazing garlic butters I’ve ever had, even if I do say so myself.

Spread that butter on bread, add the turkey, and then top with gravy and cranberry sauce of your choice. Voila! Tasty turkey sandwich! I also had a watermelon and feta salad on the side, which just made everything taste like summer. =)

Tukey Sandwich with Feta and Watermelon Salad

Was the turkey a lot of effort? Definitely. But was the turkey worth the effort? I’d say yes. A whole turkey is not something that you think of making for dinner while on your way home from work on a weeknight. But it’s definitely something that I would make for a Sunday night dinner with friends to impress.

Besides, the leftovers just sealed the deal for me. If nothing, it was worth it to then be eating the awesome juicy turkey in my meals for the rest of the week.

Note: Tammi from Insatiable Munchies was sent Ingham frozen turkey by the lovely people from Ingham and Beyond the Square Communications.

Happy Birthday Giles!

53/365 - 02/22/11 - Happy Birthday
Picture from Shardayyy

This week on the podcast…It’s Giles’ birthday!!!! We get a little bit boozy, get specific about how we like our meat and get ice cream in the mail! We talk about our favourite cocktails, bacon vodka, eat at Little Vienna and discuss crazy gelato flavours!

Download the audio file here (4.6MB, 9:12), or subscribe to the podcast on iTunes

From the Frypan – Gobble Gobble! (6:00)

This week in our kitchen, it’s LEGENDARY!!!!! The turkey is finally roasted, and we talk about the aftermath.

Waka Waka – The Earl of Sandwich (09:26)

In Waka Waka we continue the hunt for amazing sandwiches, and we eat at Little Vienna. We also talk about the bread-to-filling ratio – it’s a thing!

From the Ice Box – Deep Freeze (12:34)

We’re gearing up for summer with make at home gelato! What’s your favourite flavour?

And don’t forget to listen to the end for the Trivia of the Week!

Trick or Treat!

Picture from Peter Moxom

This week on the podcast we get passionate about curd, we go slightly cuckoo, and get all nice and toasty! We talk about the simplest recipe for passionfruit curd, Coco Cubano at Rouse Hill, novelty toasters, and the mythical Turducken.

Speaking of Turkey, do you have a favourite Turkey recipe? If you do, I’d love to give it a try! Just drop me an email or leave a comment below!

Download the audio file here (4.6MB, 9:12), or subscribe to the podcast on iTunes

From the Frypan – Fruits of the Heart (1:21)

What did we get up to the kitchen this week? We share a simple delicious recipe for passionfruit curd, or in fact any sort of fruit curd you’d like to make!

Waka Waka – Cuckoo for Cocoa! (3:04)

This week’s gluttonous adventure comes from the depths of the amazon jungle…or so we like to think. We talk about the new Coco Cubano in Rouse Hill, and ask the question: where can you find the best hot chocolate?

From the Ice Box – Mythical Creatures from the Deep (5:00)

How do you like your toast? In this week’s From the Ice Box we talk about novelty toasters and the mythical Turducken. Can it be done? What other cool things can you do with a Turkey?

And don’t forget to listen to the end for the Trivia of the Week!