Posts tagged Ingredients

Rose and Vanilla Tea

IMG_9755

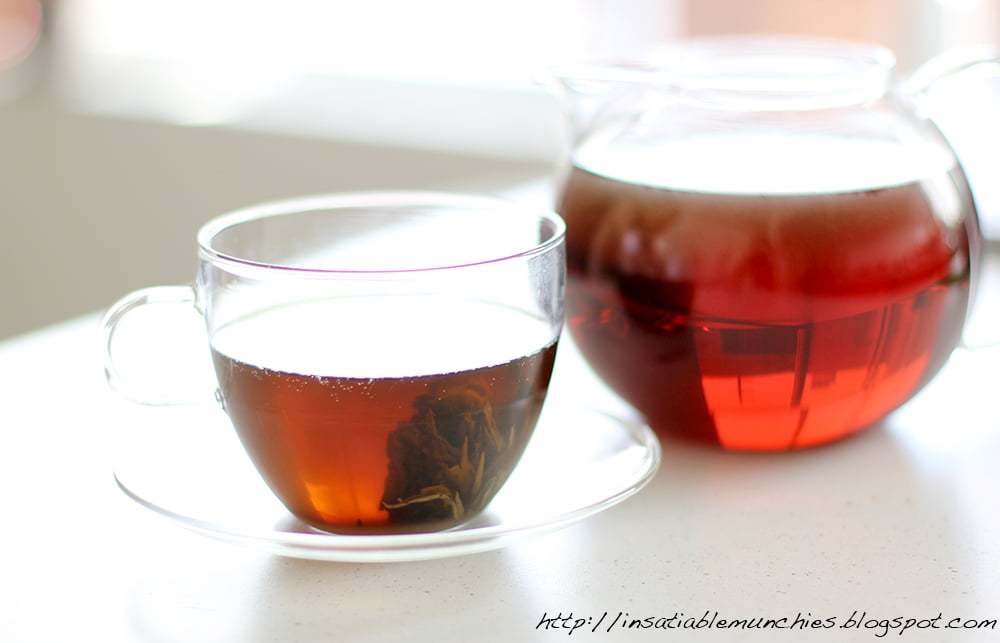
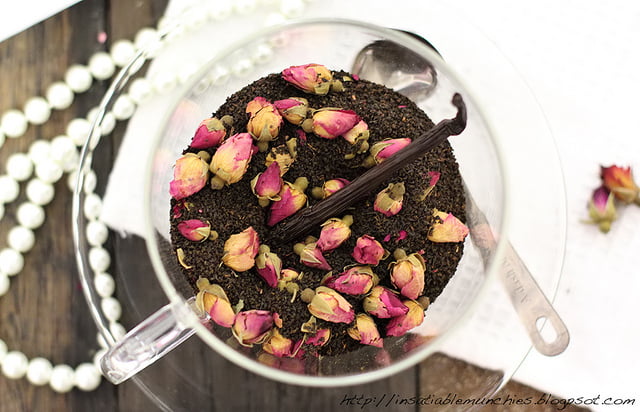
More gift ideas for mum in the leadup to Mothers’ Day! Thoroughly inspired by Dilmah’s French Vanilla and Rose Tea – one of my mum’s favourite because it’s so fragrant – I decided to make my own Rose and Vanilla Tea!

IMG_9757
It’s so dead easy – Just get a box of tea leaves – I used black tea – and add dried rose buds and a vanilla pod in. You can get rose buds from places like T2, or I just got mine from the local Asian shop. As for the vanilla pod, I used the vanilla pod from Queen Fine Foods. I was very luckily sent some from Beyond the Square Communications – thank you Carrie! – but these vanilla pods are also the ones that I keep in my pantry. They are the better ones that you can find readily available – I’ve tried some from other brands that are just brittle and dry and hard to work with – and the aroma just fills the room once you open that cute test tube bottle they come in. 
Simply split the vanilla pod open, and then stick it into the tea and dried rose buds to infuse. 
To gift, might I suggest getting a reusable coffee/tea cup and filling it with the tea mix? That’s what I’m sending to my mum, together with a tea strainer, of course. 
IMG_9771
I also added a bit of cling wrap to the top before closing the rubber lid to help seal the infusion in. 
I hope this doesn’t spoil the surprise – Happy Mother’s Day ma!!! 

Earl Grey Chocolate Truffles

IMG_9800

With roses, a popular gift is chocolates. So, moving in with the tea theme – my mum likes tea =) – I really liked this recipe that I was sent by Horizon Communication Group and thought that it would make a great gift idea! The ganache turned out really gooey, so I just rolled the chocolate truffles using tea spoons, then coated them with white chocolate.

Earl Grey Infused Truffle
Adapted from Dilmah’s Real High Tea Recipe

2/3 cup heavy cream
2 tbsp unsalted butter
Earl Grey Tea from three tea bags
170g high quality chocolate

Heat the cream and butter over low heat and bring to the boil.

Stir in the tea leaves and allow to infuse of the heat for 5 minutes. Break chocolate into a heatsafe container – I used a mixture of dark chocolate and milk chocolate – and pour the tea infusion over the chocolate through a fine sieve, pressing against the tea leaves to squeeze out all the tea.

Stir till all the chocolate is completely melted, and place in the fridge to set.

Once set, roll out the ganache into balls. Place on a lined tray and pop tray into the freezer for a couple of minutes to firm up.

Meanwhile, melt white chocolate chips with some butter to loosen it to coating consistency. Take your cold chocolate balls out of the freezer and coat with melted white chocolate. Use two forks to drain off the excess before placing on a lined tray and pop back into the fridge to allow everything to set.

Sprinkle with sea salt to finish.

IMG_9804
The result is luscious, luxurious chocolate truffles that have all the aroma of earl grey tea, finished with the palate cleansing sea salt. And if sea salt is not your thing, feel free to finely grate some lemon zest over the top! Delicious either way, and great for a gift. 
What are your favourite chocolate combinations? 

Heston Blumenthal’s Chicken Stock

I am a rabid fan of Heston. There are many people who think he’s crazy, and he probably is, but I just LOVE the inquisitive nature of this man because I think I share the same spirit. I think that since I’ve started following his work I’ve had a better understanding of what I’m doing in the kitchen, and his devotion to creating the ultimate dining experiences have completely inspired me.

And so, after watching a show entitled, “How to Cook Like Heston”- where in each episode he focuses on one ingredient and explains what you can do with it – I’ve decided to try out the chicken stock recipe that I saw on the show.

Read More

Cherrypick Yoghurt, Darlinghurst

IMG_9096

It was a perfect day for frozen yoghurt – it was sunny, hot, summery, but not disgustingly so. I was looking forward to attending the event that I was invited to by Cherrypick Yoghurt to sample and learn about their yoghurts. I got off the train with a hungry tummy…

…And maps on my phone decided to send me to the other side of Darlinghurst. So I had to trek all the way back down Oxford St in a heat that was becoming more and more disagreeable by the minute, and arrived at Cherrypick Yoghurt out of breath.

Which, didn’t seem like such a bad thing after all. This cute little shop decorated with bright candyland colours instantly cheered me up. Candy cane stripes in a cherry red were everywhere, and really added a feel of whimsy.

But that didn’t mean at all that the owners Winnie and Daniel were at all capricious. It was quite the opposite. I could feel their passion for the product when I was instantly engaged in a conversation regarding the intricacies of yoghurt flavour development. Quite unlike other yoghurt shops that I’ve seen where the base mix for the frozen yoghurt is a runny milky liquid much like a soft serve mix, Cherrypick Yoghurt actually has real, thick, creamy yoghurt at its core.

IMG_9117

According to Winnie, a lot of research and thought went into this base yoghurt. Chocolate is a popular flavour, and they wanted to make sure that chocolate flavoured yoghurt didn’t taste odd, as the luxurious taste of the sweet chocolate can sometimes clash with the sour after taste of the yoghurt. So they worked with yoghurt suppliers in the states to develop a recipe that would complement the other flavours that they wanted to build on top of the base flavour.

And hand in hand with this particularity about flavour, is a fastidiousness about quality. Winnie and Daniel first fell in love with frozen yoghurt in the US, when they went on a holiday with their daughter. A trip to Yoghurtland in the States ignited the imagination of both Winnie and their daughter, and started a pilgrimage to start their own shop with all of the wonder and whimsy, while still retaining the quality and dignity of the yoghurt. 

Now, they have a family owned shop on Oxford Street, where their four year old daughter can invite her friends from kindergarten to visit ‘her shop’ (how cute is that?). That base yoghurt is truly delicious, and Winnie and Daniel – both of whom quit their day jobs in the financial sector to put all their effort into this – brought the recipe that they developed in the US and are supplied by an Australian owned yoghurt company.

Adamant about not adding extra cream or having their mix watered down, the quality of the yoghurt really stands out to me in the original flavour. I usually pick a fruity flavour of frozen yoghurt, but I’d happily eat buckets of Cherrypick’s original flavour. I really like that they are not about trying to imitate ice cream or other frozen treats, but they are trying to carve out a niche – it’s all about the yoghurt, and a quality yoghurt at that. I also really enjoyed my conversation with Winnie about the health benefit of frozen yoghurt – yeah it might have some health benefits, but at the end of the day it’s a dessert, and should be eaten in moderation as well. Winnie happily shared every single detail regarding calories and sugar, and was very candid and transparent about the nutritional facts about her yoghurt.

Oh, and just to add to the whimsy, they are also selling cupcakes supplied by someone their know really well.

IMG_9124

IMG_9092

How cute is that? Besides the fact that I was invited, I really loved the transparency and research that is going into Cherrypick Definitely a yoghurt shop worth going back to.

Cherrypick Frozen Yoghurt
(02) 8021 7859
Shop 28, 59 Oxford St
Darlinghurst, 2010

Cherrypick Frozen Yoghurt on Urbanspoon


View Larger Map

Queen Make-At-Home Gelato Kits, Part 2

layout 2

From top: Vanilla and Vegemite, Strawberry and Balsamic Glaze swirl

I was recently sent 4 flavours of Make at Home Gelato Kits from the lovely people from Beyond the Square Communications and Queen Fine Foods. But rather than have the usual – straight vanilla, strawberry, chocolate and lemon – I wanted to do something special, something interesting.

To get inspiration for what I wanted to do with the strawberry gelato, I got a punnet of ruby red strawberries – I’m so happy that they’re in season now – and thought about what I’d usually eat with them. Then it clicked. Balsamic Glaze. I absolutely adore strawberries macerated in balsamic vinegar and a sprinkle of sugar, and a glaze would swirl gorgeously into the strawberry gelato.

Reducing the Vinegar

The balsamic glaze is dead simple to make. Simply heat up a cup or so of balsamic vinegar – this is going to reduce by about half, so just double the quantity of however much glaze you’d like to make – until it’s reduced almost to half, then add about a third of a cup of densely packed brown sugar. Continue heating – making sure that the mixture does not burn – until you reach a thick, syrupy consistency.

Strawberries with Balsamic Glaze

And there you go, a dead simple balsamic glaze to add to your strawberry gelato.

Making the gelato was also really easy:

Instructions

I loved the little pictures that came on the back of the box, and it simply involved whisking in your liquid of choice – in this case it could be milk for a gelato or water for a sorbet – and churning it in your ice cream machine of choice.

Whisked away

Ice Cream Churner

It’s a really good idea to make space in your freezer to chill the mixture slightly before churning, just because the little churners with the insulated bowls aren’t always the best at bringing your ice cream all the way. After about 35 min of churning (the machine manufacturers recommend 40 min max) I ended up with this:

Strawberry Gelato

It was slightly thicker than when I first started, but not by much. It provided me just enough thickness to swirl the glaze through, but if I wanted to put anything thicker through, it simply would not have held. As mentioned in the previous post, DO NOT place the ice cream mixture in the churning bowl and leave it to chill in the freezer. The mixture will start freezing solid and you’ll have a real issue getting the paddle of the churner to turn properly. Place the mixture in a bowl and into the freezer for about 20 minutes. Then churn it according to the machine’s instructions.

When you’re done, simply pour it into your freezing container of choice – mine was a one litre capacity plastic container – and swirl the glaze through.

Strawberry Gelato

Then simply cover the ice cream in cling wrap, ensuring that the cling wrap touches all the surface of the ice cream and that there aren’t any air bubbles, put on the lid, and then into the freezer to freeze the rest of the way. The reason that the cling is so important is that the freezer actually dehydrates your food by having the water in your food freeze into ice crystals on the surface, ruining the texture, and causing you to have ‘crunchy’ ice cream.

It also makes your ice cream look like a funky marble watercolour. =)

After leaving it sets in the freezer, simply serve on pancakes with some fresh strawberries, or dig into it with your favourite ice cream topping.

Balmy Strawberries

Only the Vanilla was left, and in my search for interesting sweet/savoury combos I decided to make a leap and try Vanilla and Vegemite. It’s dead simple – after churning the vanilla ice cream, simply swirl in the vegemite. I used vegemite from a squeeze bottle just to make things simpler.

V for Vanilla

I think it’s one of my favourites – the salty, umami flavour of the vegemite complemented the creamy sweetness of the vanilla bean gelato perfectly. Very addictive.

This is absolutely a great easy way to make your own flavour combinations without having to worry about making the ice cream custard etc. Yes, it’s not as flexible as infusing the custard with really cool flavours (I’d love to make a savoury ice cream next with garlic infused cream) but it’s also something easy and creative that you can make on a week night to treat yourself on the weekend.

I’m still treating myself to that rich chocolate gelato. I love salted butterscotch. That is all. Yum.

Note: Tammi Kwok of Insatiable Munchies was given Queen Make At Home gelato kits by the nice people at Queen Fine Foods and Beyond the Square Communications.

Olive Oil Brunch

_DSC0025

Sorry for taking so long!! I feel like my poor blog has been neglected because of other things, but never fear, I’m back and hungrier than ever!

Which is why when I got invited to this Olive Oil Brunch (in my head it’s a feast) by Simon who had passed on the invitation from Fouad, I was uber excited. I’ve always loved the celebration of the harvest, and this definitely did not disappoint!

The brunch was held at Efendy, located in Balmain.

_DSC0062

The olive oil was served in various ways:

_DSC0020
Labna

_DSC0030
Hummus

_DSC0032
Dukkah

_DSC0034
Baba Ghanouj

And all the dips were served with Turkish bread

_DSC0037

Seriously, the food was DELICIOUS. Maybe it was because I was really hungry, but I actually think it was just because there was an abundance of deliciousness going around.

The olive oil is from Fouad‘s father’s land, and is organic, hand-picked and cold pressed. The olive oil is quite mild and light, and it made me feel healthy just eating it. I had envisioned women wrapped in finely woven scarves dancing to a primal beat, luring you into the symphony of gorgeous flavours. This oil, for me, is a great carrier of flavours, and seemed to complement and augment the flavours of everything that I ate it with.

As the brunch was winding down, a gorgeous crate of ripe figs came out to play.

_DSC0044

I decided to try the figs with the olive oil, and MAN WAS IT TASTY!

_DSC0060

The oil carried the sweetness of the figs so well, and gave me a certain kind of creaminess that added luxury to the fresh fruitiness of the figs.

It makes me want to try all my fruit with olive oil.

Many thanks to Simon and Fouad for the invite and the event!! I so need the recipe for that Baba Ghanouj…

Pepe Saya, Tempe

Untitled

Most people who know me know that I have a thing for butter, or any diary product. Which is why I was especially excited when – after the Master the Mousse Class with Homemade Fine Foods – Pepe from Pepe Saya offered to show me and the French Wench the making of truffle butter!!!

First, you start with really nice butter…

P2117895

P2117893

This is a cultured butter, and besides the usual richness that you get from this epitome of rich dairy goodness, there is a slight sourness that I feel adds a lot of character and attitude. It’s like the luxurious meets funk. I like.

Pepe was telling us that he first matures the cream, then adds the culture, before churning the butter. And here I thought that all you had to do was over-whip cream!

Side tangent – besides butter, Pepe Saya also has a range of other foodstuffs, my favourite of which is the Taramasalata!

IMG_0564

P2117906

I can’t say definitively that it’s amazing Taramasalata because I didn’t grow up with it, but I can say that it’s definitely something I really like! The acid/garlic/saltiness is just so addictive to me that I finished half the jar pretty much upon arriving home. LOVE IT!.

Anyway, back to the truffle butter.

Pepe got sent truffles from Perigord Truffles of Tasmania.

IMG_0511

And man this is the biggest pile of truffles that I’ve ever seen in person.

IMG_0518

The smell was just absolutely intoxicating.

Pepe simply shaves off the truffles into the butter and then mixes it. Apparently truffles have an ‘expiry date’ of 10 days, and so you really have to work quickly. Butter does help preserve the flavour though – the oil prevents air from coming into contact with it, and so prevents oxidation.

And truffles are not just amazingly delicious, they are also really pretty on the inside!

IMG_0525

Isn’t that marbling simply gorgeous?! It gets me excited like a good piece of steak. Okay, that came out wrong, but you know what I mean.

Oh here’s another sight to behold!

IMG_0541

TEN KILOS OF BUTTER SPECKLED WITH TRUFFLE!!!!!

*wipes drool*

Maybe it’s just me, but the combination of the two is just so simple yet so mind blowing!!!

And we actually got to take little pats home!!!!!!!!

IMG_0549

!!!!!!!!!!!!

Just in case there are any doubters out there, it is DELICIOUS. Although the suggestion was to let it melt slowly onto a good steak, I had mine spread onto sourdough toast, and it was one of the most satisfying lunches I’ve ever had. Light and yet luxurious at the same time, I just kept breathing in the intoxicating scent of the truffles mingling seductively with the cultured butter.

Even if truffle butter isn’t quite your thing and isn’t enough to get you as excited as I am, Pepe also has butter master classes ($80) and cheese making classes ($220/class, 3 parts) as well! Just contact them for more information. With my history of loving cultured diary products, I know what I’m asking for as my birthday present!

Pepe Saya
Unit 4, 3 Wood Street
Tempe NSW 2044
+61 2 9519 2793
info@pepesaya.com.au


View Larger Map

Flavoured Salts

PC207567

What do you do when beautiful ruby red plump juicy truss tomatoes are in season and on sale? Inspired by both Chow.com’s bloody mary salt recipe and that tomatoes are in season, I decided to try making Bloody Mary Salt.

PC207559

This salt is great for finishing a steak, rimming the glass of your favourite cocktail, or on your eggs in the morning! Or a medley of other ideas that your hunger can come up with.

You’ll need:

For the dried tomatoes (the original recipe just calls for sun-dried tomatoes that are not packed in oil)
3 ripe truss tomatoes
Olive Oil
Sea Salt

Other ingredients:
Tobasco Sauce
Worchestershire Sauce
Sea Salt Flakes

First the tomatoes. Feel free to use bought dried tomatoes and skip this step – I just felt that it was such a waste of such marvelous produce!

Pre-heat your oven to 180C.

Slosh a few glugs of olive oil (don’t over do it, trust me) over tomato halves in a roasting tray.

PC207563

Liberally sprinkle sea salt over the tomatoes. Don’t worry about over-salting – this is the basis for a flavoured salt, so having the tomatoes on the salty side to start off with is not going to matter much.

PC207565

Roast the tomatoes till they are nice and juicy, with a slightly charred edge. Take the tomatoes out of the oven and leave to cool.

Now for the tricky part. If you have a dehydrator (like I do – it was a moment of weakness!), use it. Otherwise, set your fan forced oven on the lowest heat setting, and arrange the tomato halves on a cake rake that’s placed over a roasting tray. Leave the tomatoes till they are dried out – they should still be slightly pliable, but dry to the touch. If you used too much oil when roasting the tomatoes, then they’ll be slightly oily to the touch as well.

***If you’re using store bought dried tomatoes, start reading here***

With your fan-forced oven still on the lowest heat setting, drizzle some Tobasco sauce and Worchestershire sauce on the dried tomatoes. Leave in the oven to dry out completely. The original recipe called for the tomatoes to be first cut into strips, but I quite like the pooling of the sauce in some parts of the tomatoes, giving a stronger flavour.

PC207555

Either way, the tomatoes do have to end up in strips.

PC207557

Then place the tomato strips in a food processor or spice grinder with some sea salt – don’t plonk the whole packet in! – and start pulsing. The initial salt will help stop the tomato from sticking together. Then just add salt till you’re happy with it. I kinda wished that I’d added a little less salt so you get more of the tomato, but at the end of the day, it’s a finishing salt, so how wrong can you go? =)

Also, salt recipe not complicated enough for you? YOU WANT MORE???!!!!

*evil laugh*

PC207558

Excuse the bad picture.

Some time ago, I had this idea in my head that I wanted to make a clear bloody mary. I was experimenting with gazpacho recipes, and realised that fresh tomato juice is actually…clear.

So.

I pureed the extra truss tomatoes, a couple of sticks of celery, part of a clove of garlic, and strained the lot in a clean piece of muslin.

Then, just rim a shot glass with the bloody mary salt by going round the edge with a wedge of lemon, then dipping it in the salt.

Add a touch of vodka into the shotglass, and then top up with the tomato/vegetable juice.

Et voila!!!! A clear interpretation of a bloody mary. =)

I hope you’ve enjoyed my interpretation of this recipe, and if you’ve read this far, I thank you muchly!!

I’ll try to squeeze in another post before Christmas, but if I don’t, Happy Holidays everyone!!!

Money for Jam

P5195656

Lookee what I got in the mail!!!!!!!

I love food gifts. (Note: I bet you can already tell which one’s our favourite!)

Anathoth has very kindly sent me some very yummy jam, and given that I’m not a big jam person, IT IS YUMMY. Anathoth is a New Zealand company and also makes relishes and I’ve seen them making the rounds at food festivals like Taste.

P5155645

So Sean and I decided that some toast was in order.

P5155650

MAN was that Cherry Berry Jam a winner! We got sent both Cherry Berry and Rhubarb and Red Berry, but while the Rhubarb and Red Berry was a good jam, there was just something about the chunky, glossy, fruitiness of the Cherry Berry jam that made us want to devour the whole tub!!! As you can see in the picture above, what started out as, “Oh we’ll crack it open and have a taste”, turned into, “Oh goodness we need to leave some in the tub for the photo!!!!!”

Martyna from the Wholesome Cook even serves up the jam as a lovely accompanying sauce!

Swedish meatballs anyone? =)