Posts tagged Ingredients

Test Kitchen: Shaved Brussels Sprouts With Walnuts, Lemon and Parmesan

Y’all know that I absolutely LOVE testing and posting up recipes on the blog, but I’m sure it’s not as obvious that each recipe that I put up goes through hours of research, testing, a myriad of different versions, and agonising decisions regarding how it should look.

I usually start with either a craving or ingredients that I have in my kitchen, and then do tons of research to try and find interesting things to create with it. Sometimes I try out a pre-written recipe to start off with, or sometimes I start throwing things together and go from there.

Well, once in a while, a recipe just doesn’t go quite right, or just plum doesn’t work out the way you want it to!

Recently, I had bought a whole bunch of brussels sprouts on special at the green grocers, but had some left over after using them as part of a roast. So what now?

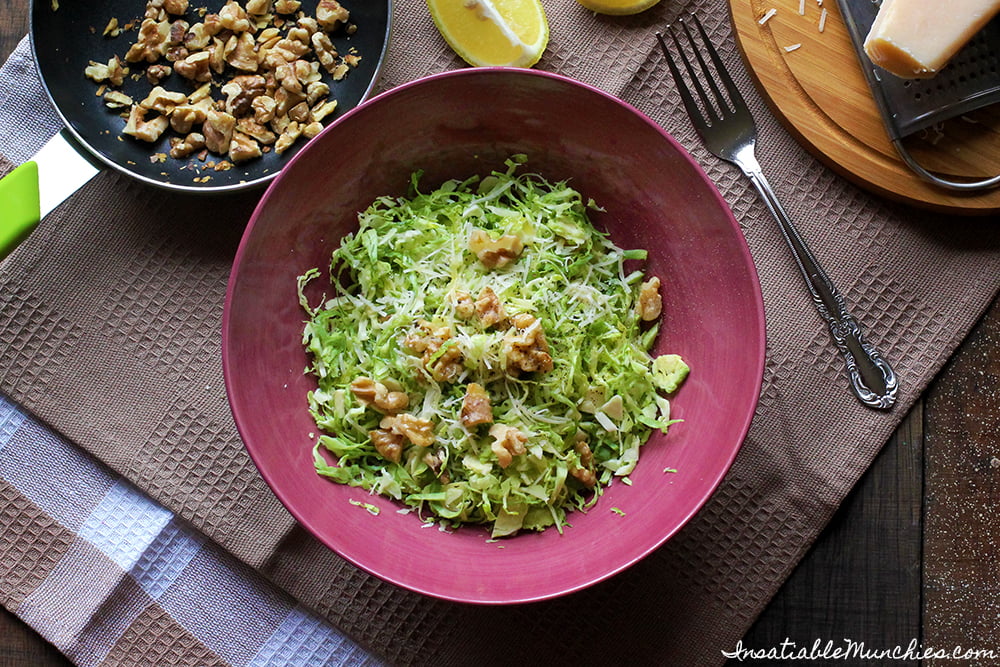
I found this nice looking idea on Gourmet Traveller – a simple salad of shaved brussels sprouts, with toasted walnuts to add depth, parmesan to add flavour, and just lemon juice to dress it. Some versions of this recipe online also had olive oil to add moisture.

So of I went, to shred those tiny cabbage-looking sprouts. I do love a good slaw, in many variations, so I was similarly excited about this particular salad. After all, in my research, there were many who described it as a more delicate cabbage-y flavour.

Well, no matter what I did, this salad was dry, and had a somewhat astringent after-quality to it. Even adding olive oil didn’t do much in terms of lubrication. The brussels sprouts themselves had a light, peppery quality to it, similar to rocket, and that went quite well with the toasted walnuts and parmesan. But I couldn’t quite get around the texture issue. Adding more lemon juice made it super sour and seemed to accentuate the dry texture, and adding more parmesan just made it worse.

In all, it was a promising recipe, but didn’t quite work out.

How about you? Have you had any disappointing recipes that you couldn’t quite figure out?

Bread-ucation!!

Bread is one of those things – you’re not guaranteed a result even if you are given the recipe. It takes technique, with the right recipe and the right conditions, to achieve the fluffy interior and crusty exterior that is the holy grail of white bread.

I’ve dabbled with bread on and off over the years, but I knew that I would absolutely get back to figuring this culinary puzzle out if it was the last thing I did!!

Read More

Pomelo Salad

Happy Lunar New Year y’all!!! May you prosper, enjoy good grades, languish in good health, live a long life and just generally have a good time in the year ahead. If you’re not familiar with it already, Chinese New Year happens in the first 15 days of the lunar calendar cycle, and I see it as an excuse for Chinese (and Vietnamese and Thai) all over the world to see their family and friends, and party and feast hedonistically and guilt-free for slightly over two weeks.

Which is why I would like to share the recipe for this pomelo salad – pomelo is meant to signify abundance so it’s lucky to eat. And besides, it’s darn tasty.

Read More

What I ate: Prosciutto and Dried Fig Canapes

IMG_9999

After making my Peach and Crispy Prosciutto canapés for a party, I learnt a few lessons:

1. Prosciutto is my favourite cured meat for that sweet/salty combo
2. Don’t buy so much prosciutto!

I had wayyyyyy too much prosciutto left over because I over estimated how much to buy, and now I’ve gotta use them up. The answer? This version of Devils on Horseback.

Devils on Horseback is usually made with prunes and bacon, and this fig and prosciutto idea first came to me from Nigella.

I used:

  • Prosciutto (I have prosciutto up to my ears)
  • Dried Figs (I got mine from the Aldi Christmas Specials)
  • Roquefort (I had some leftover from the peach canapés)
  • Habenero Honey from Honeycomb Valley
  • Baby Mint Leaves, to garnish

The rest of it is just a matter of assembly. Simply cut a dried fig into half – or quarters – add a touch of blue cheese, or any cheese you prefer, and roll up in prosciutto. I only needed half a slice of prosciutto for mine, but it would really depend on what you prefer. And how thick your prosciutto is sliced, and so forth. Then when it’s all on a platter, I just drizzled the lovely Habenero Honey that I got from Honeycomb Valley and garnished with baby mint leaves from my garden.

If you want to make it ahead of time, this dish is great to hold as little parcels. Simply arrange them on a platter and keep them in the fridge. When you’re ready to serve, leave them at room temperature for about 10 minutes – the prosciutto will thank you for it – and drizzle over the honey and scatter those mint leaves!

Simple, and delicious, if I do say so myself.

Random Notes from Hawaii

IMG_3957
Musubi

I went to Hawaii recently! And while I’ve got a lot of photos to process, and posts to write, I thought that I might start with all the random things that I thought was interesting in Hawaii.

Spam sushi anyone?

IMG_4098

SPAM is HUGE in Hawaii. Apparently, the people of Hawaii consume more SPAM per person than anywhere else in the US. Even on the shelves in the local grocery store, there are more varieties of SPAM than I’ve ever seen anywhere else. Musubi (pictured above) is an example of the omnipresent SPAM, mixed with the distinct Japanese influence from migrants after the war. A slice of SPAM is fried, coated in a terriyaki sauce, and placed on top of a shaped handful of sushi rice, secured with a piece of nori (seaweed).

I would suggest you give it a go if you visit Hawaii for the cultural aspect. It didn’t exactly rock my world in terms of flavour combination or innovation, but it’s still pretty cool and good fun. And surprisingly filling too, though for a complete meal I would suggest supplementing with some fruit/veg. 😉

In my late night prowling of grocery stores – they need more 24hr grocery stores around here! – I also found this!

IMG_3942

These sugar cane stirrers are about as unprocessed a form of cane sugar you can get, I think. I’m sure that it would be great to sweeten your coffee or tea – they remind me of the Persian rock sugar stirrers that you can get – I bought some because I thought it would be cool to use as a sweetener/decorative item for a cocktail. The original thought was that I’d use it to sweeten a Caprioska, but I haven’t opened the packet yet. Given that Hawaii used to be known for its sugarcane plantations, these are not as common as I would’ve thought, but you can still get them in grocery and convinience stores.

Also in the grocery store – have I mentioned how much I love Foodland? – are their selection of ready-to-eat items. 

IMG_3987

My favourite breakfast while I was there was a simple half of a ripe papaya, with a squeeze of lime over the top. Simple but satisfying.

Poké is another ready to eat item from the grocery store, and I’ve developed a mild addiction to it. I’ve been back in Sydney for about a week now, and I’m still suffering from withdrawals.

pokelayout
From left: Tako poké, spicy ahi poké

Poké, from my understanding, is raw cubes of fish (or pieces of seafood), in a variety of marinades. Common ingredients in the marinade include garlic, ginger, shoyu, green onions. Spicy poké commonly uses kochujang, a korean chilli paste. Limu poké uses limu, which is the Hawaiin word for seaweed.

The most common fish I’ve seen used is ahi, which is tuna. Tako (Octopus) and salmon poké are also widely found.

If snacking on tub after tub of raw fish is a bit much for you, you can also get poké bowls, which are bowls of rice topped with poké. At about $5 a pop, those bowls became my go-to lunch options. There are also other pre-packed rice bowls with other toppings. 

IMG_4139

$6.95!! I don’t think I’d necessarily get a bowl with that much ikura that cheap in Sydney. Like I said, I’m suffering withdrawals big time.

And if you’re feeling the heat after a satisfying lunch, then try to drop by Waiola for a Hawaiin shaved ice. Delicious and refreshing, it’s basically finely shaved ice that melt like snowflakes on your tongue, covered in syrup. I got a banana and lime one – green and gold! – but you can get a whole variety of flavours, with various toppings like pearl and mochi.

IMG_4105

The biggest thing that I’ve found is that the people of Hawaii are just so nice and hospitable. Every local that I’ve asked has happily told me their recommendations for foodie destinations, and even what their favourite dish on the menu is.

I miss Hawaii already. =(

SPAM, aka shoulder pork and ham

IMG_0777

Okay. I admit it. I really like SPAM. Short for Shoulder Pork and Ham, SPAM was introduced to me as ‘luncheon meat’. I fondly remember having fried, sliced luncheon meat on rice, with stir fried vegetables and sambal chilli on the side. It was a typical weekday after-school lunch that was amazingly comforting.

So when my challenge theme for this month was “Guilty Pleasures: Recipes Inspired By Cheez Whiz, Spam, Twinkies and Their Delicious Cousins”, I knew that I wanted to make another comforting meal, that’s maybe just a tad less guilty than my fond memories of SPAM.

Let’s have a look at their two components: Shoulder pork, and then ham. At about $5/kg, shoulder pork is one of the cheaper cuts of meat, with plenty of connective tissue running through it. Now usually, connective tissue means that this is a tougher cut of meat – hence the lower price. But when cooked low and slow, that connective tissue  (collagen) breaks down, and moistens every fibre of meat, making it juicy, tender, and absolutely heavenly.

What about the ham bit? Well, rather than using two cuts of meat, I was more inspired by my favourite ham glazes, which usually have maple and honey through it. Maybe a barbecue sauce with maple and honey?

IMG_0780

Pulled Pork Shoulder with Crackling Chips, Maple and Honey Barbecue Sauce, and Slaw

Pulled Pork with Crackling

2kg whole shoulder of pork, skin on (bone in, if possible. My butcher only had deboned cuts)
1L Apple juice
50ml Apple cider
Fennel Seeds
Cumin Seeds
Dried Chilli
Paprika
Ground Ginger
Whole head of garlic cloves, roughly crushed but unpeeled
Salt
Pepper

Preheat the oven to 220C. Place the spices – I just included what I used, feel free to use whatever you want – in a mortar and pestle with salt and pepper and grind to a powder. Score the rind of the pork with a sharp knife, careful not to cut through to the meat. Rub the rind generously with salt, rubbing into the scores. Turn the shoulder over and pat the ground spices into the meat.

Place the meat into a roasting tray – try not to use one that’s too big or you’ll waste apple juice later on – and put into the middle rack of the oven for about 30 minutes, or until you see the crackling start to happen. Then take the tray out, and spoon out most of the fat. Place the roughly crushed garlic cloves into the bottom of the tray and fill it up halfway with apple juice. Cover it with foil, leaving a tiny corner open for steam to release, and place back into the oven. Turn the oven down to 160C, and roast for about 4 hours, checking every 2 hours or so to make sure that there’s enough liquid.

The pork is done when you can pull apart the meat easily with a fork.

IMG_0767

At this time I remove the pork to rest, remove the rind, and place it back into a 180C oven over a rack on a flat tray to finish doing its thang.

And the juices from the bottom of the tray? Well I save about a cup of it for the sauce, and reserve the rest to keep the meat sitting moist after I’ve pulled the shoulder apart.

Maple and Honey Barbecue Sauce

500ml passata
250ml juices reserved from pulled pork
Roasted garlic from the pork shoulder
1 heaped tbsp of tomato paste
1 heaped tbsp of dijon mustard
3 tbsp Worchestershire sauce
100ml maple syrup
50g honey. I used a hot habenero honey that I was very generously given from Honeycomb Valley

Squeeze out the roasted garlic into the bottom of the saucepan, and add the rest of the ingredients. I like my barbecue sauce on the sweet side, but if you don’t, simply add less maple syrup. Cook down the sauce till the desired thickness, and take it off the stove.

Cabbage Slaw

Cabbage
Parsley
Honey
Apple Cider Vinegar
Wholegrain mustard
Olive oil
Salt
Pepper

Shred the cabbage, and finely chop the parsley. Season and mix in with the other ingredients to dress.

IMG_0783

To finish, tear apart the shoulder by pulling at it with two forks, then place into a bowl and pour over the juices from the pan to keep it moist. Serve with buns, sauce, slaw, and break up the crackling into ‘chips’ – I simply cracked it along the score lines. 
I know it’s not exactly the SPAM of my childhood, but it’s my take on the comforts of days gone by. How about you? What’s your guilty pleasure? 

Lychee and Lemon Sorbet

IMG_0735

It’s hot. It’s really hot. I know, I’m from Singapore and I should be used to heat worse than this right? And I should stop my whinging? Well whether I whinge or not, IT’S STILL HOT. And having been in Sydney for a few years now, I know that the hottest is still to come. So I think that it’s a good time to start making fruity frozen treats that will get us through to hot chocolate weather again.

As when I made my blood orange sorbet, the basic ratio is simple: for every cup of liquid, you add a quarter cup of sugar. So for this mixture, I used:

  • 2 3/4 cups lychee juice**
  • 1/4 cup fresh lemon juice
  • 3/4 cup sugar

**Not lychees in syrup. I bought unsweetened lychee juice in at a small green grocer, and it was a blend of lychee and grape. 

Simply mix the lychee juice and sugar in a saucepan over low heat just till the sugar dissolves. Add the lemon juice, then chill in the fridge overnight and churn according to your ice cream maker instructions.

IMG_0732

What I got was an incredibly refreshing sorbet that wasn’t too sweet because of the addition of the lemon. If you feel like the mixture is not tart enough for you, feel free to adjust it to your taste. As long as the basic ratio of liquid (unsweetened) to sugar is correct, you will still get a smooth, almost juicy frozen treat. 
Just a little something to ease the summer heat to come. =)

Sea Urchin Chawanmushi

IMG_0688

I’m starting to think that I’m a complete Japanophile. Japanese food is one of my go-to comfort foods, and many of the ideas that come to me in the middle of the night – yes I’m that obsessive about food – seem to revolve around Japanese flavours and ideas.

So when it came to coming up with canapé ideas for my little dinner party, the classic Japanese chawanmushi came to mind, but I was going to serve them in sake cups! Aren’t they cute??

Now I know that by definition chawanmushi should be steamed in tea cups, but sake cups are just the perfect size for canapés, and allows your guests to try a variety of things without getting too full!

If you’ve never tried chawanmushi, it is a light, moreish, delicate Japanese steamed savoury egg custard that can have a variety of ‘toppings’, from chicken, to gingko nuts, to mushrooms, to fish cakes…whatever floats your boat.

I happened to get given extremely fresh sea urchin from Cando Fishing – who also gave me lots of information about when’s a good time to buy sea urchin – and I thought that I should keep the actual egg custard simple.

I used:

  • 3 large eggs (60g)
  • 2 cups of dashi (500ml)
  • 2 tsp of light soy sauce
  • 2 tsp of mirin
  • Baby shimeiji mushrooms

The important ratio here is that of the eggs to the dashi. You can use some other stock, if you’d like, but I find it simpler to make my own dashi by softening some konbu (kelp) in water, bringing the water up to about 60C, removing the kelp after about 10-20 minutes and adding dried bonito flakes. Simply bring the water up to a simmer, and simmer it till you like the flavour (about 10 minutes for a small batch). Strain, and you’ve got your dashi!

Let the dashi cool before you add them to your beaten eggs and strain. Then pour them into your prepared containers, add your ‘toppings’ (not the sea urchin, though) and steam. Because the egg mixture is so delicate, it’s a good idea to par-cook or fully cook your toppings before adding them into the raw egg mixture. I just lightly simmer the shimeiji mushrooms in some stock or salted water before adding them to the bottom of the cups. Remember to keep the mushroom water though – it’s incredibly tasty and ends up being like a mushroom stock that you can use somewhere else.

Then cover your little cups of goodness with some foil and steam them till they are just set. They will never really stop wobbling till they’re pretty much overcooked, so I find that turning off the heat when they’re at the stage of the softest silken tofu, the mixture changes to an off-white, opaque colour, and leaving it to finish in its residual heat is the most effective.

Then carefully lift them out and using a tea spoon, gently top them with sea urchin – if you’re using any. You can also just serve them straight out of the steamer as is – I know that it’s a breakfast favourite for me. I find that it’s a great starting canapé because it really whets the appetite, and prepares your guests for more.

IMG_0687

If you like my sea urchin ideas, why not try my oysters with sea urchin butter, and sea urchin shooters! 

Oysters with Sea Urchin Butter

IMG_0707

As much as I love to eat sea urchin straight out of the sea, I also can restrain myself from popping these sweet morsels in my mouth long enough to know that it is also a versatile and delicious ingredient. So how better to top delicate pacific oysters than with a luxurious sea urchin butter?

Inspired by Tetsuya’s sea urchin butter that he puts on veal, I decided to play up a slightly more citrusy note because I’m serving these oysters as canapes and I don’t want something too rich weighing my guests down. The trick to this is to use the freshest ingredients, and thankfully I got given some amazing sea urchin from Cando Fishing.

I used:

  • Sea Urchin
  • Butter, softened
  • Sea Salt
  • Wasabi (just a teeny tiny bit!)
  • Lemon Juice

I placed everything in a blender – quantities to taste – then rolled it up in some baking paper to harden in the fridge. When it came time to serve the oysters, I cranked up the grill to its highest setting, and topped each oyster with half a teaspoon of butter – just a pat. Grill till the oysters are warmed through and the butter is melted and toasty brown, then finish with grated orange zest, to lighten it up.

IMG_0705

I love how the sea urchin just boosts the ‘seafood-ness’ of the oysters, with the butter providing a luxuriousness, and the suggestion of wasabi and lemon in the background to cleanse the palate. You can, of course, add a choice of herbs like chives if you’d like a little green, but I like this mouthful as it is. Juicy, plump, and decadent. I had a couple of friends who weren’t too crazy about the fresh sea urchin – nothing’s ever a hundred percent – and they loved the oysters.

Such a simple recipe, and a crowd pleaser every time.

If you are thinking of trying sea urchin but not quite sure how to get a good fresh one, you can read about my chat with John of Cando Fishing here to find out more.

Sea Urchin Shooters

IMG_0697

I ADORE sea urchin. Well, I adore all seafood, but sea urchin has a delicate creaminess that sends me to the moon and back. There is just something about the way that it melts on my tongue, coating my palate with the sweetness of fresh seafood before fading away, leaving me with a craving for more. But sometimes when you want to serve urchin at a party, you want to dress it up just a little – maybe a simple dressing to enhance the flavour perhaps?

Well thanks to Cando Fishing, I had some really fresh sea urchin to play with.

For the dressing, I used

  • Soy
  • Ginger
  • Mirin
  • Yuzu Juice
  • Sesame Oil
  • A touch of sugar

I first placed the soy, miring and slices of ginger into a pot, and heated it gently to infuse. I added just a touch of sugar to balance the saltiness, and the yuzu to provide a light citrusy flavour. Then I remove the ginger slices, and let the dressing cool.

IMG_0696

Then place your pieces of sea urchin in your shot glasses, drizzle the cooled dressing over the top, and top with finely diced seeded chilli – I didn’t cause my guests were not chilli eaters – and a light grating of ginger. I find that if I keep my ginger in the freezer, it gives me feathery shavings that just add a light zing to the sea urchin. If you like a little booze in your shooters, might I suggest a tiny splash of sake.

This is a slightly different angle to shooters – if you like oyster shooters you should absolutely try sea urchin shooters – and this allows you to enjoy the natural sea flavour of the urchin. So tasty.

The most important thing is to get super fresh urchin, and I very luckily got given mine by Cando Fishing that I met at the Fine Food Australia Trade Show. I had a chat to John, who was from Cando fishing and very patient in answering my questions. You can read about my chat with John – and all about the best season for urchin and how to pick the best urchin – here.