
I hope you have been enjoying their Christmas Eve. I just thought that with the whirl wind of activity that I’ve been going through I’d just drop a note to wish you a very Furoshiki Christmas.
Scarves have never looked so cute! =)

I hope you have been enjoying their Christmas Eve. I just thought that with the whirl wind of activity that I’ve been going through I’d just drop a note to wish you a very Furoshiki Christmas.
Scarves have never looked so cute! =)
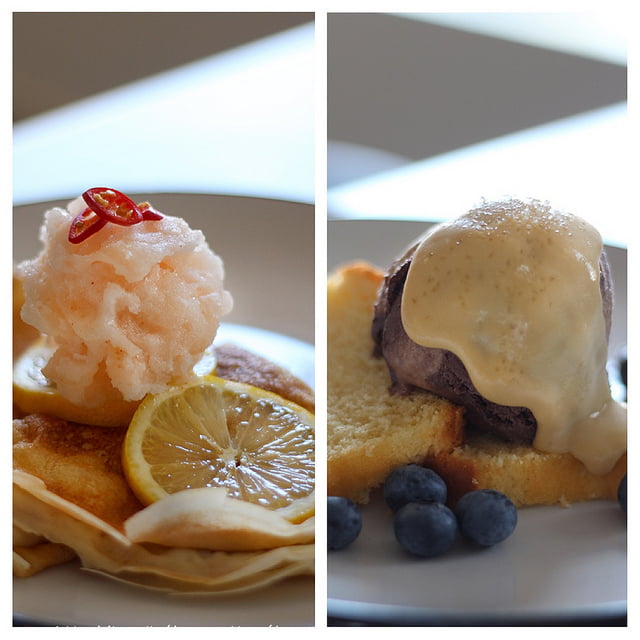

From left: Lemon and Chilli Sorbet, Chocolate Gelato with salted butterscotch sauce
I absolutely LOVE receiving things in the mail, and this time it’s Queen Make-At-Home gelato kits!!

Summer has rolled around in a BIG way, and that’s just put me in the mood for ice cream – meaning that these kits have come at the perfect time. I received 3 gelato kits and 1 sorbet, and I wanted very much to do something special with them. I know that being someone who constantly craves variety and surprise, I simply could not just have your run of the mill gelato flavours. But what to make?
Well, the lemon was the easiest to figure out. Something that I absolutely love with my acid, is the burn of chilli. I just love how the citric acid in lemon makes my tastebuds ring like the bells of Notre Dame, and then the capsacin in the chilli just blaze right through, setting them all on fire. Of course, I didn’t want my gelato to make people reach for a glass of water, but I did want it to bite back. And so…

It was simple, really. Lemon sorbet churned with just a touch of good chilli jam. Is there anything more simple? The sorbet turned out refreshing, and yet tantalising at the same time! We had it topped off on lemon-juice-and-maple-syrup-soaked crepes. Because the chilli jam wasn’t knock-your-socks-off spicy, it provided a slight warmth in my throat following the first tang of refreshing lemon. A match made in heaven.
The chocolate gelato was just slightly harder to pair. I wanted something that wasn’t too traditional, but it was a little harder to match unconventional ingredients to a chocolate gelato – in my opinion – as the rich, luxurious texture and deep flavour of the chocolate will just dominate. Yes, it can definitely be argued that there are many different things that can be done with chocolate, but I think that chocolate gelato is a very different beast. You’re not just dealing with the texture, flavour and mouth feel of pure chocolate, but also of the frozen creaminess of the gelato. (And I already used the chilli idea for the lemon.)
But thinking about the creamy texture and luxurious flavour made me think, “Why not just push luxuriousness and decadence to the next level? Surely more of a good thing can’t be bad?”
The answer? Salted butterscotch sauce.

Butterscotch is a relatively simple thing to make. Supposedly you’re meant to use actual scotch in it, but I don’t happen to have it around the home. The recipe seems to work well enough, and can be used to top off any number of desserts.
Salted Butterscotch Sauce
125g Butter
1/2 cup Brown Sugar
1/4 cup cream
Coarse Salt/Sea Salt Flakes
In a shallow pan, melt the butter and whisk in the brown sugar. Once the mixture has come to a boil, add the cream in slowly and whisk to combine. Continue to cook the sauce over low heat until the sauce thickens slightly. Sauce will continue to thicken upon standing. Once cooled, fold in sea salt flakes, careful not to let them fully dissolve into the sauce. Alternatively, sprinkle the salt on just before serving.
I would strongly recommend a small serving of the ice cream and sauce. I’m a person who loves any amount of decadence and hedonism, but even I felt that this was a truly rich combination. Immensely satisfying in small amounts. And given that it’s so easy to make, you can have frozen desserts to last you through those 40C days to come!
What I really like about these kits are that they are so simple, and allow you to concentrate on adding your spin on it without having to worry about things like infusing a particular flavour into the ice cream custard. These flavours are just so basic that you can add any multitude of things to it, and just create your own!
Of course, with great creativity still comes things to look out for, and these are my top things to look out for when making these gelatos:
But the best part is that these mixtures are so forgiving. You don’t have to worry about overcooking or curdling a custard. Even when I wasn’t able to make a completely homogenised gelato/sorbet mix – I was too eager and put all the liquid component in at once – the gelato still froze to a creamy consistency and was delicious nonetheless.
What are your favourite delicious gelato combinations?
Note: Tammi Kwok of Insatiable Munchies was given Queen Make At Home gelato kits by the nice people at Queen Fine Foods and Beyond the Square Communications.
I like to think that I am a fairly moderate person. So I don’t know why my little and seemingly harmless projects always seem to balloon into large undertakings where I feel like I’ve bitten off slightly more than I can chew. Of course, as a foodie thats not always such a bad thing, but you get the drift.
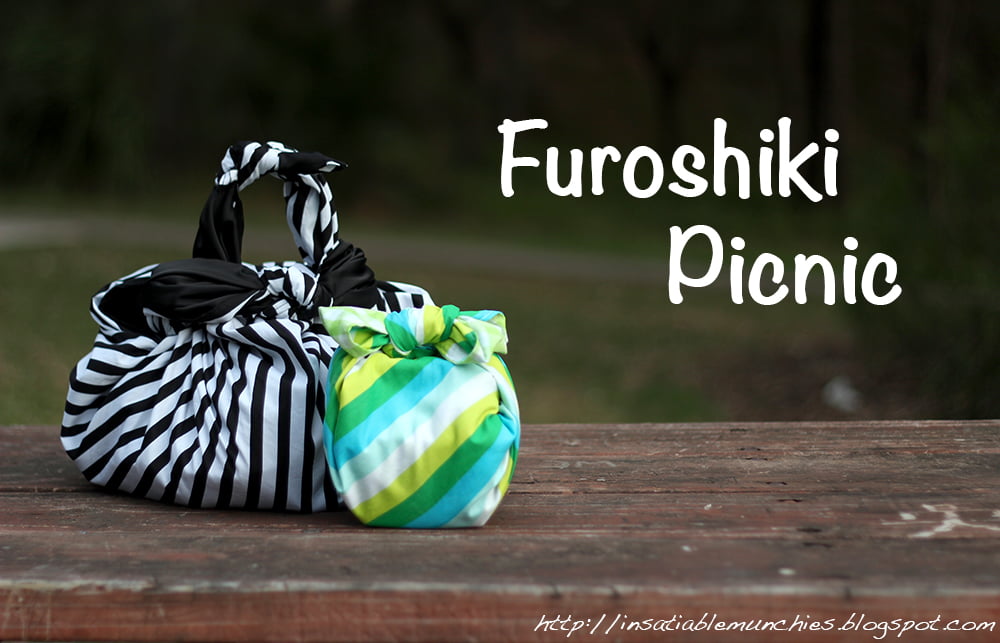
Recently I’ve been into the Japanese art of Furoshiki. Furoshiki is basically the art of taking a square piece of cloth —I’ve made a couple of Furoshiki cloths of my own — and making a few knots, such that it can become a variety of bags, complete with handles!! The above picture shows just two of the ties, and you can pretty much get as creative with it as you want to. You can wrap gifts in scarves, knot it into a grocery bag, make it into a lunch bag…
So I thought, “if you can wrap your lunch in it, why not bring more food? I know, we’ll have a picnic!!”
And so we did. I had a nice juicy watermelon in the fridge, so I decided to try a recipe for watermelon salsa.
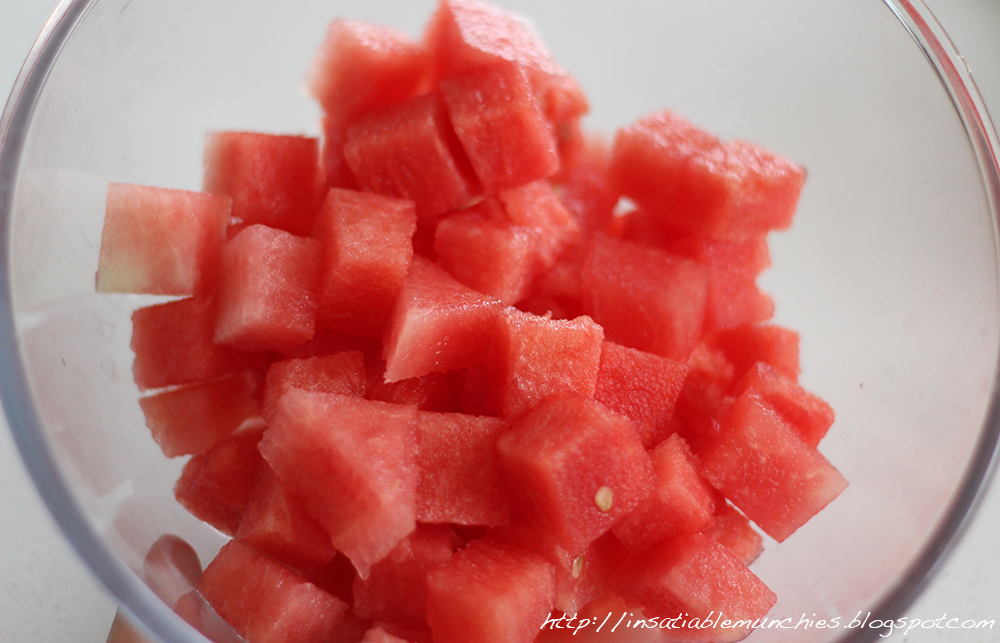
I kept some watermelon aside just for eating (Tetris anyone?) and put the rest in a bowl with some salt, finely diced red chilli and Spanish onion, balsamic vinegar, and parsley.
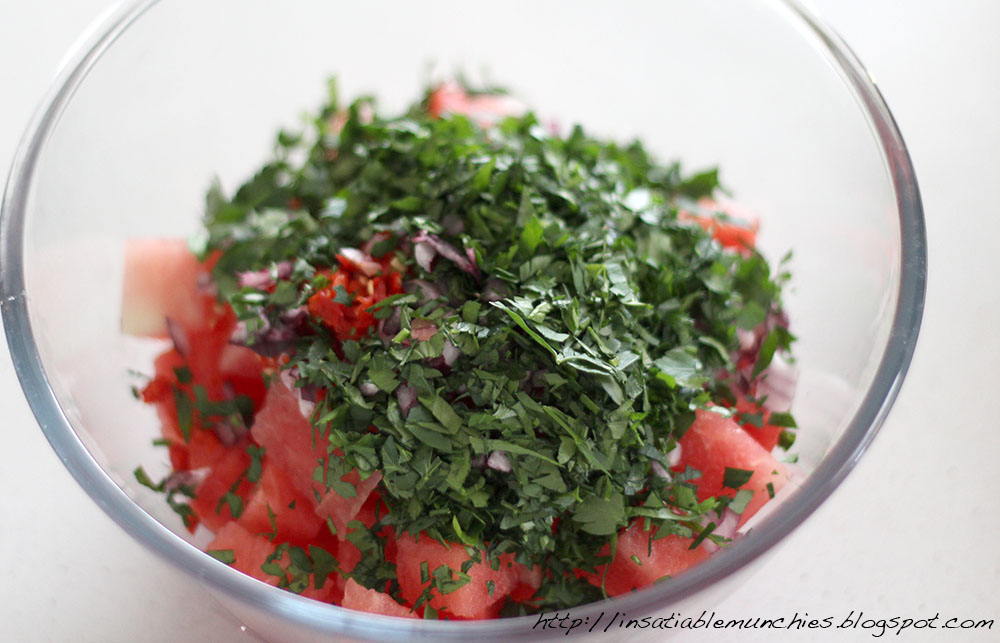
The flavours were left in the fridge to meld for about an hour, and then packed, ready to go for our picnic!!

In the end, I had a larger Furoshiki bag and a little one, and this was what we managed to fit in them.
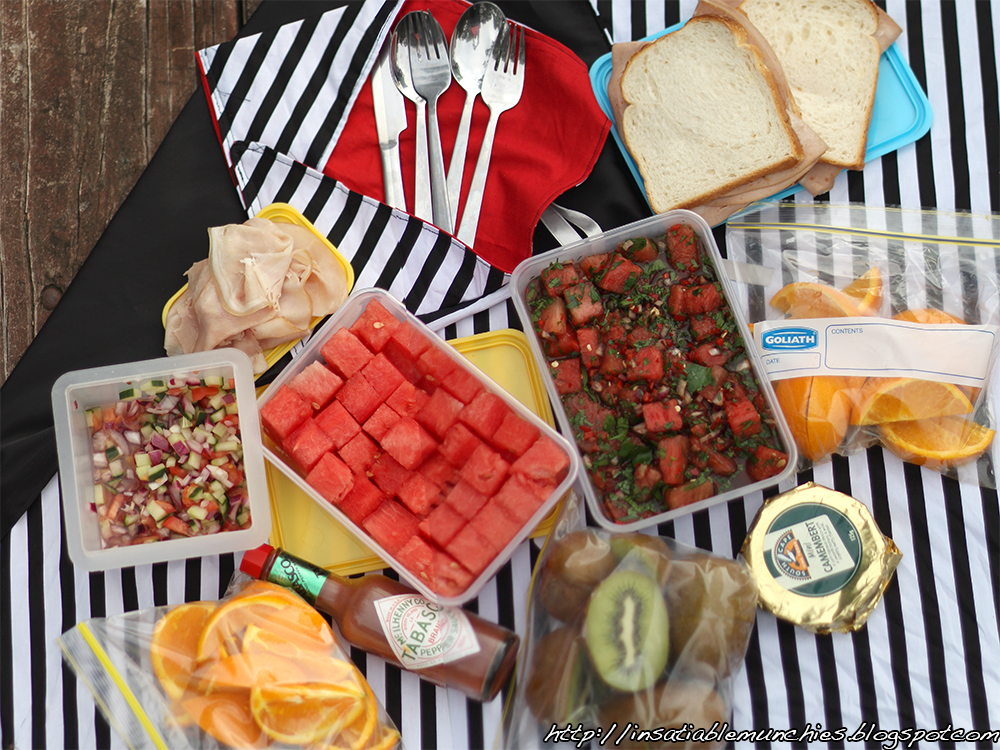
Between the two of us, we had five mortadella and pickle sandwiches, orange wedges, kiwi halves, Camembert, tomato and cucumber salad, a container each of the watermelon and the watermelon salsa, shaved ham, and a bottle of homemade lemonade.
Needless to say, we couldn’t finish all the food, but it was worth the whole day of preparing food for an afternoon in the park.
Gotta love the little projects. 🙂
So. This is one of those stories that just grow and grow, until you get to the end and think to yourself, “How did I get here?”
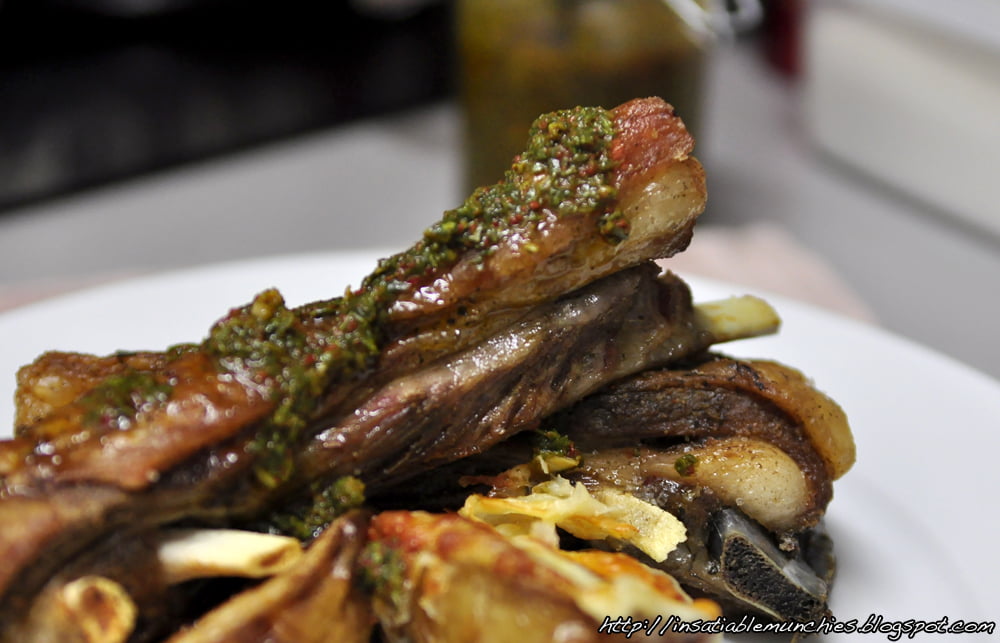
A friend of mine very kindly gave me big bunches of basil from his garden (as you can probably guess, this post is just slightly overdue). Rather than just do the usual and make pesto, I thought that I’d try something different, and make a Basil Chimmichurri (recipe to follow).

OMGGGG!!!! How cute are these novelty shot glasses from oo.com.au?? I kind of want some to serve my clear bloody mary in!

Most people who know me know that I have a thing for butter, or any diary product. Which is why I was especially excited when – after the Master the Mousse Class with Homemade Fine Foods – Pepe from Pepe Saya offered to show me and the French Wench the making of truffle butter!!!
First, you start with really nice butter…


This is a cultured butter, and besides the usual richness that you get from this epitome of rich dairy goodness, there is a slight sourness that I feel adds a lot of character and attitude. It’s like the luxurious meets funk. I like.
Pepe was telling us that he first matures the cream, then adds the culture, before churning the butter. And here I thought that all you had to do was over-whip cream!
Side tangent – besides butter, Pepe Saya also has a range of other foodstuffs, my favourite of which is the Taramasalata!


I can’t say definitively that it’s amazing Taramasalata because I didn’t grow up with it, but I can say that it’s definitely something I really like! The acid/garlic/saltiness is just so addictive to me that I finished half the jar pretty much upon arriving home. LOVE IT!.
Anyway, back to the truffle butter.
Pepe got sent truffles from Perigord Truffles of Tasmania.

And man this is the biggest pile of truffles that I’ve ever seen in person.

The smell was just absolutely intoxicating.
Pepe simply shaves off the truffles into the butter and then mixes it. Apparently truffles have an ‘expiry date’ of 10 days, and so you really have to work quickly. Butter does help preserve the flavour though – the oil prevents air from coming into contact with it, and so prevents oxidation.
And truffles are not just amazingly delicious, they are also really pretty on the inside!

Isn’t that marbling simply gorgeous?! It gets me excited like a good piece of steak. Okay, that came out wrong, but you know what I mean.
Oh here’s another sight to behold!

TEN KILOS OF BUTTER SPECKLED WITH TRUFFLE!!!!!
*wipes drool*
Maybe it’s just me, but the combination of the two is just so simple yet so mind blowing!!!
And we actually got to take little pats home!!!!!!!!

!!!!!!!!!!!!
Just in case there are any doubters out there, it is DELICIOUS. Although the suggestion was to let it melt slowly onto a good steak, I had mine spread onto sourdough toast, and it was one of the most satisfying lunches I’ve ever had. Light and yet luxurious at the same time, I just kept breathing in the intoxicating scent of the truffles mingling seductively with the cultured butter.
Even if truffle butter isn’t quite your thing and isn’t enough to get you as excited as I am, Pepe also has butter master classes ($80) and cheese making classes ($220/class, 3 parts) as well! Just contact them for more information. With my history of loving cultured diary products, I know what I’m asking for as my birthday present!
Pepe Saya
Unit 4, 3 Wood Street
Tempe NSW 2044
+61 2 9519 2793
info@pepesaya.com.au

Apparently it all started with Lemon Curd. Homemade Fine Foods was founded on a ‘real food’ philosophy – food that you can buy, that will taste like what you’ve made at home. The upside? Not having to spend hours making it yourself. And while I love cooking, that idea sounds fantastic to me – especially after a long day on my feet where I don’t even really feel like cooking dinner, much less dessert.
And they don’t only do desserts, they teach you how to make it too!
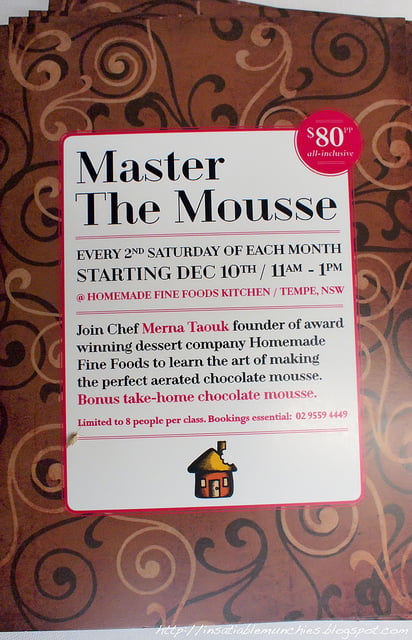
I was invited over the weekend by a very lovely Merna from Homemade Fine Foods to a Mousse Class!! This was an especially exciting piece of news for me since my only (failed) attempt at a chocolate mousse ended up with whipped cream in a glass and bits of chocolate that had hardened because of the coldness of the cream. Go figure. Lovely, aerated, velvety dessert just seems to elude me. After having to admit recently – with much embarrassment – that I had no idea how to create a proper mousse, I was thankful for the opportunity to be taught the proper techniques.
The class was at 11am, and because Sean was working the night shift, we had not had anything to eat and were starving. No worry though, they feed you!


I love events that feed you.
Great cheeses from Small Cow Farm and luscious, ripe fruit really started the day off well for me. Even Sean – who had worked all night – was happily relaxed and ready for some chocolate.

And boy was there chocolate.
We were taught the difference between using compound chocolate and coverture – compound can be heated to a higher temperature and so will pasteurize your eggs – and what temperatures to look for when melting your chocolate.

Interesting fact – while cocoa butter has a melting point of 35C, compound chocolate contains fats that allow you to heat it higher, hence allowing the pasteurization of the raw eggs!
The class also covered whipping and incorporating the meringue…


And the whipped cream, amongst other things.

Now, Sean isn’t the biggest cook around – in fact, he hardly ever gets to step into the kitchen because I’m always in there doing something or the other – but there’s at least one part of the class that he absolutely LOVES.

How can anyone say no to that finished product! Sweet, creamy, and comforting, we got to take home two massive tubs of mousse that had been decorated with swirls of dark chocolate. The mind-boggling thing was that such a simple technique looks so pretty and polished. Definitely something that I’ll try on my next dessert served in glass.
There were some moments that we had to wait – for example, the chocolate mixture had to cool down before mixing in the whipped cream – and guess what happened?
They feed you some more!


Did I mention that I love being fed?

And while I have a weakness for Bread and Butter pudding – it’s a comfort food that many members of my family have in common – and Sean devoured the Sticky Date Pudding, the Raspberry Panna Cotta was my favourite!
This story is too cute – you’ve gotta see it for yourself:
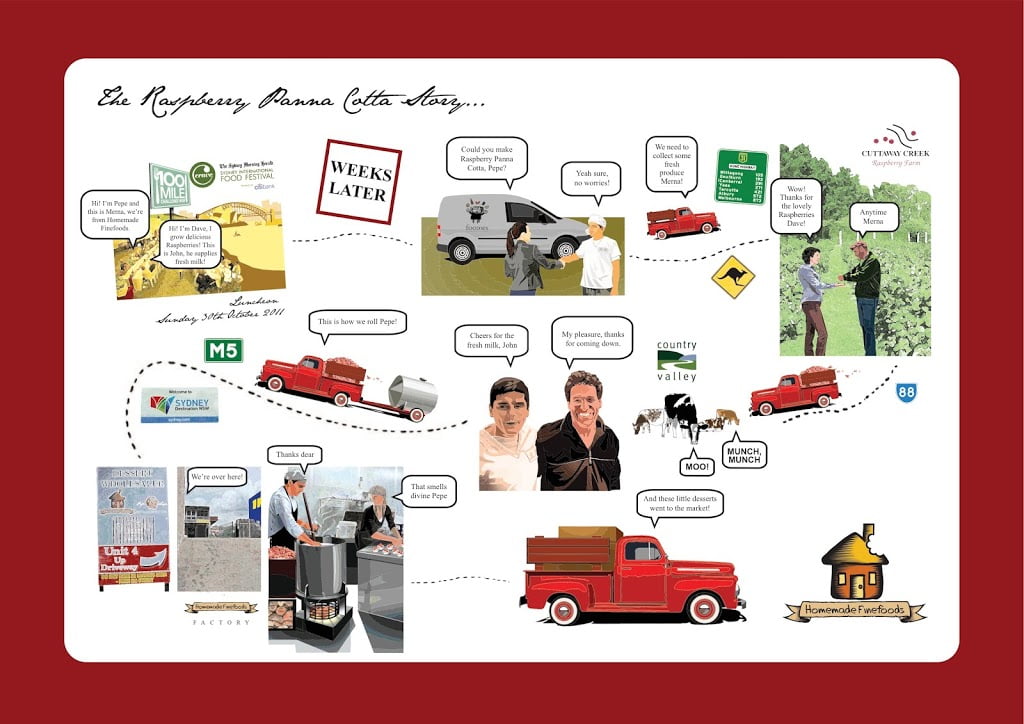
SO CUTE!
Apparently Cuttaway Creek Raspberry Farm also supplied raspberries to many well-known Sydney restaurants. I have to pay a visit to them some day.
But anyway, back to the class. I left with arms full of tubs of mousse and a belly full of delicious desserts. Both Sean and I thoroughly enjoyed ourselves, and that was a feat for Sean after pulling an all-nighter.
It was a great way for us to cook together as a couple, and a great pre- (or post) Valentine’s day present!
The class costs $80 per person and is held at their factory store in Tempe.
Homemade Fine Foods
Unit 4, 3 Wood Street, TEMPE NSW 2044
(02) 9559 4449
info@homemadefinefoods.com.au
View Larger Map
Note: Insatiable Munchies was invited as a guest of Homemade Fine Foods

Huat ah!
Since it’s Chinese New Year, I thought that I’d make the very auspicious-sounding Profit-eroles. Geddit?
Ok, bad joke.
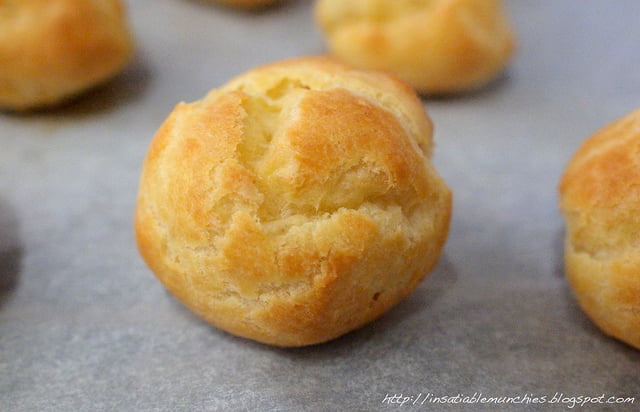
But anyway, these delicious little morsels are always great as party food, and allows you to have dessert done and dusted in advanced.
First, the Choux pastry. This is basically the same pastry as eclairs, so you can take the recipe and just change the shape if you’re so inclined.
Choux Pastry
I got this off Taste.com.au and it works every time!
80g butter
1 cup water
1 cup flour
3 eggs
Bring the water and butter to a boil.
Take the mixture off the heat and stir in the flour. Vigorously I’ve heard somewhere (don’t quote me, though) that the secret to puffed, gorgeous profiteroles is making sure that the gluten is well-worked.
SO WORK IT! *insert relevant hip-hop song here*
Once the flour is incorporated, work in the eggs, one at a time, making sure that each one is mixed in before you add the next.

You’ll end up with a slightly spongy wet-ish batter.
Put aside to cool.
Meanwhile, preheat the oven to 180C (fan forced). I’ve found that you can probably afford to turn the heat down slightly from that – the pastry needs to ‘dry out’ slightly inside, and baking it for slightly longer at a slightly lower temperature helps that process along.
Using two teaspoons, spoon heaped amounts of the pastry mixture onto a lined baking tray.

Using wet fingers, pat down any peaks that can end up burning in the oven.
Bake till puffed and golden brown.

Armed with a sharp knife and a pair of tongs, carefully pierce the bottom of the profiteroles and place back on the tray, pierced side up, and put back into the oven with the door ajar. MAKE SURE THAT THE OVEN IS TURNED OFF! You don’t want burned pastry. This will help it finish drying out.
Then, move on to the custard.
Custard
3 egg yolks
1/3 cup sugar
1/3 cup flour
1 3/4 cup milk
Vanilla bean or vanilla extract
In a medium saucepan, whisk the egg yolks with sugar.

The mixture will turn a very pale yellow, and although the original recipe says to use caster sugar, I wouldn’t worry too much about it – it ends up being dissolved anyway. Also, I used a mixing bowl to start off with, but really, you could do this in a saucepan. Less washing up is always good.
Whisk in the flour, and when that’s incorporated, add the milk and vanilla and place the saucepan on VERY LOW HEAT. Trust me.
Keep whisking. This is not a good time to walk away, be distracted by the TV, or do the dishes. WATCH THAT SAUCEPAN LIKE A HAWK.
And keep stirring!!!
Very soon, you’ll see the mixture begin to thicken.

At this point, burning will follow quickly. I think what happens here is a little bit like the Tangzhong method in baking. For the science behind it, click here. Basically the starch (flour) will thicken in the process of water and heat and will so contribute to the texture of the custard.
Still, I’m not too crazy about this particular recipe as I find the custard a touch too runny, but feel free to use any piping custard recipe you’d like.
The profiteroles can last about a week when stored in an airtight container, in the fridge.
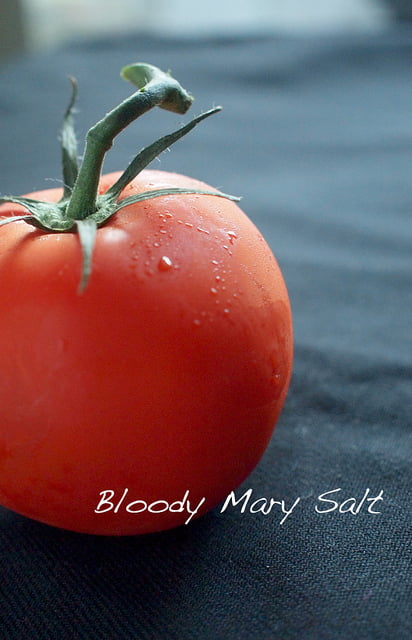

What do you do when beautiful ruby red plump juicy truss tomatoes are in season and on sale? Inspired by both Chow.com’s bloody mary salt recipe and that tomatoes are in season, I decided to try making Bloody Mary Salt.

This salt is great for finishing a steak, rimming the glass of your favourite cocktail, or on your eggs in the morning! Or a medley of other ideas that your hunger can come up with.
You’ll need:
For the dried tomatoes (the original recipe just calls for sun-dried tomatoes that are not packed in oil)
3 ripe truss tomatoes
Olive Oil
Sea Salt
Other ingredients:
Tobasco Sauce
Worchestershire Sauce
Sea Salt Flakes
First the tomatoes. Feel free to use bought dried tomatoes and skip this step – I just felt that it was such a waste of such marvelous produce!
Pre-heat your oven to 180C.
Slosh a few glugs of olive oil (don’t over do it, trust me) over tomato halves in a roasting tray.

Liberally sprinkle sea salt over the tomatoes. Don’t worry about over-salting – this is the basis for a flavoured salt, so having the tomatoes on the salty side to start off with is not going to matter much.

Roast the tomatoes till they are nice and juicy, with a slightly charred edge. Take the tomatoes out of the oven and leave to cool.
Now for the tricky part. If you have a dehydrator (like I do – it was a moment of weakness!), use it. Otherwise, set your fan forced oven on the lowest heat setting, and arrange the tomato halves on a cake rake that’s placed over a roasting tray. Leave the tomatoes till they are dried out – they should still be slightly pliable, but dry to the touch. If you used too much oil when roasting the tomatoes, then they’ll be slightly oily to the touch as well.
***If you’re using store bought dried tomatoes, start reading here***
With your fan-forced oven still on the lowest heat setting, drizzle some Tobasco sauce and Worchestershire sauce on the dried tomatoes. Leave in the oven to dry out completely. The original recipe called for the tomatoes to be first cut into strips, but I quite like the pooling of the sauce in some parts of the tomatoes, giving a stronger flavour.

Either way, the tomatoes do have to end up in strips.

Then place the tomato strips in a food processor or spice grinder with some sea salt – don’t plonk the whole packet in! – and start pulsing. The initial salt will help stop the tomato from sticking together. Then just add salt till you’re happy with it. I kinda wished that I’d added a little less salt so you get more of the tomato, but at the end of the day, it’s a finishing salt, so how wrong can you go? =)
Also, salt recipe not complicated enough for you? YOU WANT MORE???!!!!
*evil laugh*

Excuse the bad picture.
Some time ago, I had this idea in my head that I wanted to make a clear bloody mary. I was experimenting with gazpacho recipes, and realised that fresh tomato juice is actually…clear.
So.
I pureed the extra truss tomatoes, a couple of sticks of celery, part of a clove of garlic, and strained the lot in a clean piece of muslin.
Then, just rim a shot glass with the bloody mary salt by going round the edge with a wedge of lemon, then dipping it in the salt.
Add a touch of vodka into the shotglass, and then top up with the tomato/vegetable juice.
Et voila!!!! A clear interpretation of a bloody mary. =)
I hope you’ve enjoyed my interpretation of this recipe, and if you’ve read this far, I thank you muchly!!
I’ll try to squeeze in another post before Christmas, but if I don’t, Happy Holidays everyone!!!

I LOVE this cupcake stand!!!!!!!! Besides food, I have a thing for really creative things to do with food, and this is da shiznit!!
Also, I think it’s fate that I come across this just as I’m watching a Queen Documentary.
tee hee!