Posts tagged Product Talk

Sponsored Post: 7 thoughts I had whilst trying Crust Pizza’s new Simply Better Range

Review of Simply Better Range from Crust Gourmet PizzaBrought to you by Nuffnang and Crust Pizza

“Healthy” is not often, in my world, associated with the word “delicious”. My circle of friends strongly believe in the “fat is flavour” mantra (I knew there was a reason why we were friends), and we eschew trends that are healthy for healthy’s sake. So when I was invited to try Crust Pizza’s new Simply Better Range (with Spelt and Wholemeal flour, no less!), I didn’t know what to expect.

Review of Simply Better Range from Crust Gourmet Pizza

So here are 7 thoughts that I had while stuffing pizza into my face:

1. This crust is better than I thought!

I know it seems like an obvious thing, but even when a whole line of restaurants is called “crust”, I am usually faced with dry, stiff bases that only serve to hold up the ingredients. Here, the crust was tender and bready, and had a surprisingly good chew while still holding up the various toppings! Also, a wholemeal and spelt flour that wasn’t dry. Well done.

2. Who knew that broccolini belonged on a pizza

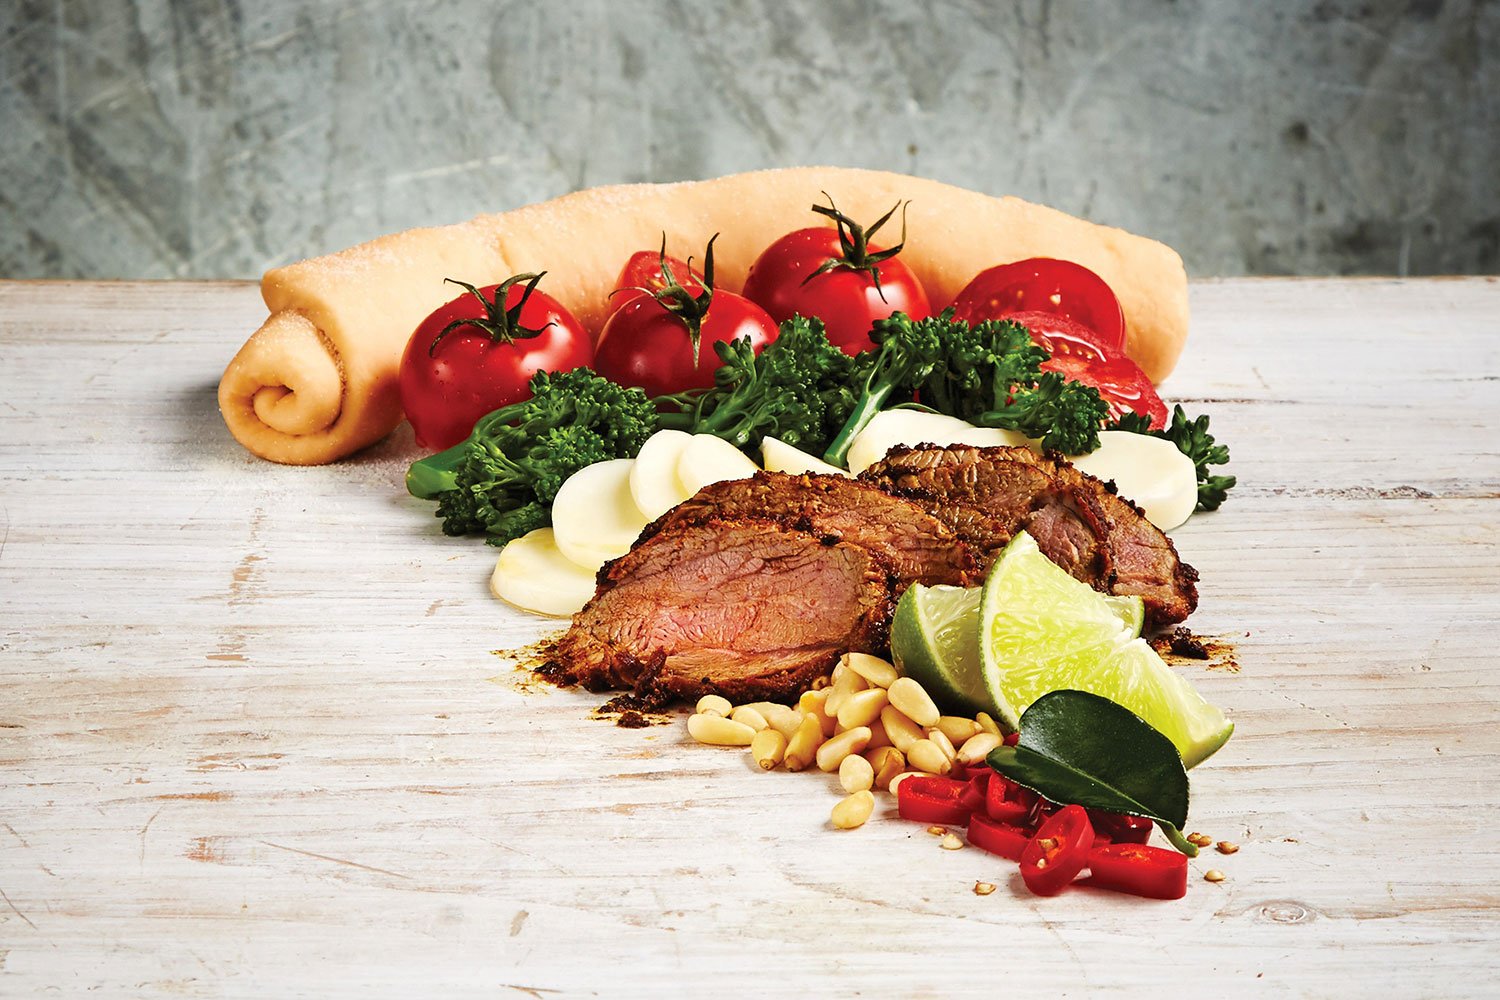
My favourite of the three new pizzas, the Biltong Lamb, had broccolini on it. Broccolini! Who knew that this maligned vegetable (which is usually relegated to sad steamer baskets) actually has found a happy place on the top of a pizza. It was tender, without being overly bitter or in-your-face, and provided great support for the spiced lamb and tangy yoghurt and lime.

3. Chilllaaaayyyyyy

Did you know that kilo for kilo, chilli is more packed with vitamin C than oranges? Yeah. Not that I need a reason to have any more chilli in my diet. So it was a happy night for me when the three new pizzas that I tried – Biltong Lamb, Harissa Chicken, Wagyu Shoga – were served with chilli. By themselves, the pizzas were mildly spiced and layered with flavour from the sauce and the various toppings like pine nuts, mushrooms, capsicum, rocket etc. But for me, the only way to have them is with a side of fresh cut chilli, to really kick your night into gear!

4. I wish the chunks of meat were bigger

So at the launch, we were lucky enough to try the house-cooked meats on its own, and then with the pizza. And you know what? I agree with fellow blogger Jason: the chunks of meat made such an impact, that I wish that it was similarly chunky on the pizza. It was shredded finer, I guess for ease of eating, but still, you notice it especially when you know how good it can be.

5. Pizza by the beach needs to be a thing.

We were lucky enough to be treated to Crust’s new range by the beach, and you know what? It totally needs to be a thing, guys! There’s just something about eating by the crashing waves – from a distance, of course, because you don’t want sand in your food – that just really elevates the experience.

6. They make the pizza bases in store? No way!

So you’d may have made the same assumption that I did: that Crust Pizza stores get in their pizza bases frozen, and then tops it off and bakes it in-store. Well, a rather interesting conversation with the manger of one of their stores revealed to me that they get deliveries of bags of flour, and make the dough right in the store! Something totally unexpected, but appreciated all the same.

7. So is this Australian pizza?

Okay, so I’ve heard plenty about how “Pizza is meant to be simple”, and that “pizza from Italy doesn’t have 20,000 toppings on it”. And yeah, there’s definitely a beauty to a really simply-made pizza with a cracking chewy base and a barely warmed fresh tomato base. Sure. But what if this is just another style of pizza? What if this is Australian Pizza? I mean, we’ve already claimed burgers by putting beetroot in them, maybe this is just another kind of pizza that’s unique to Australia?

Review of Simply Better Range from Crust Gourmet Pizza
———————————————

I don’t think Crust Pizza is trying to portray themselves as “authentic Italian Pizza”, and you know what? I think it’s cool that they’re doing their own thing. They’ve got a smart casual style going for them, serving up the kind of pizzas that you’d eat by the beach, in your flip flops, enjoying the cool autumn breeze. And now with the new Simply Better Range, you’d fit right into the Bondi crowd, too!

Love your pizzas? Well you might also like our reviews of Pizza Design Co., and Just Man’oushe! And if you want to make your own, we’ve also got a pizza scroll lunchbox hero recipe for you as well.

The cheese of it all! Nuffnang Product Talk: Frico Cheese

Sydney Food Blog Review of Frico Cheese

I’ve always had a love affair with cheese. When I was first introduced to camembert as a teenager, I loved it so much I once ate a whole wheel of it in the closet. Like literally, sitting inside of the closet so that no one could come between me and that glorious oozing block.

But I’ve never had as much luck with hard cheeses. Something about the drier texture always said ‘meh’ to me, and while I’ve never disliked it, it has never swept me off my feet.

Well dutch cheese actually straddles the two worlds for me. It definitely classes as a hard cheese, but somehow retains a lovely creamy, almost waxy quality to it that doesnt dry out your mouth like hard cheeses can do. I was given samples of Frico cheese – maasdam, edam, and gouda – and I actually got real hooked on the cumin-studded Gouda. Frico is a Dutch company who’ve been making cheeses since 1898, so who better to rope me into the hard cheese world than such an experienced cheese maker?

And I didn’t have to be in the closet this time!

However. As nice as it was as an eating cheese, it wasn’t quite as good in other applications. The sweetness of the maasdam and gouda meant that it interfered with the aioli that I like to put on my sandwiches, even though it melted nicely. Finely grated, it was an okay cheese for salads, but didn’t really contribute as much as say, parmesan for a kick of sharp flavour.

But who needs to cook with it when you can just EAT THE WHOLE BLOCK?! It may not be a staple in my cooking, but at least now I have a fantastic, rich addition to my cheese platter – which may or may not replace my meals. Shhhhh.

I promise that I won’t get intense about the gouda though. 😉

Insatiable Munchies was provided samples of Frico cheeses for review.

Beak and Sons Butcher Style Sausages

Sausages have been underestimated, I think. Relegated to Sunday sausage sizzles, and often served up smothered with ketchup, the humble sausage is often associated with “kid food” and “mystery meat”.

But really, not all sausages are created equal.

Read More

Pepsi Next, Product Talk by Nuffnang

When the days are hot and stifling in its humidity, I always crave a cold sweet drink to quench my thirst. Which is why I was really excited when Nuffnang offered me the opportunity – as part of Product Talk by Nuffnang, to try the new Pepsi Next.

I only ever crave sodas in very specific situations – like the aforementioned hot sticky days, and warm summer barbecues with friends and family- and Pepsi Next brings me a different sort of sweetness. It’s sweetened with Stevia, which is extracted from a plant. Stevia has zero calories – which is useful for you if you’re watching that sort of thing – and the human tongue perceives Stevia as many times sweeter than sugar in the same concentration.

Stevia is not completely understood yet, and studies are still being conducted about the effects of Stevia on the body. There have been studies that suggest that sugar alternates are not effective for diets since it doesn’t actually satisfies the body’s sugar craving, but really, who drinks soda for health reasons? No. You drink soda because you enjoy it and it’s tasty! At least, I do.

It does have a great flavour, and gives me that little sigh of satisfaction when I have that soda craving.  So that’s enough for me.

If you’d like to try Pepsi Next for yourself, just head on over to their Facebook page for the chance to go for a taste test!

Have you tried it? What do you think?

Product Talk: Maggi Stir Fry Creations

IMG_0069

As part of Product Talk by Nuffnang I was sent some Maggi Stir Fry Creations to try. And we all know how I feel about receiving things in the mail. =)

IMG_0074

Each pack comes with two sections: the infusion paste and the finishing sauce. You’re meant to marinate the meat in the infusion paste, then fry off your meat and veggies in the finishing sauce. The idea is that it gives you two layers of flavours, in the most speedy fashion possible.

The back of the packet calls for 500g of meat and about 3 cups of chopped veggies.

IMG_0068

I love that the instructions are basically to throw whatever meat and veg in that you have on hand. It’s a great way to clear the fridge, and provides flexibility for whatever is in season. And a great way to get in your 5 fruit and veg in a day! Just fry the veg off in order of hardness to softness, and add the meat. Then the finishing sauce, and you’re done.

IMG_0072

The result?

Well, I’m partial to slightly more punchy flavours, so these are a little on the light side for me. I did add a little more chilli and a dash more soy, but I suspect that it’s also because I added extra noodles in. On the whole, it’s a great idea for a super convenient lunch or dinner, especially if you’re not the kind of person to have a pantry cupboard full of random condiments – as I have. And as with anything, it is always easy to tweak things if you’ve got a decent base to start with. And it’s a decent enough base.

It also managed to create a portion that was enough for a big serving for 4, or a medium serving for 6. And with all the veggies I managed to pack in, I was plenty full on a medium serving anyway. Definitely something I would use as a base in a pinch.

Easy Lemon Tiramisu – no sabayon!

IMG_9842

I’ve still got some Anatoth lemon curd that was sent to me by Beyond the Square – thank you Carrie! I think fruit curds are a fabulous way to recapture that sensation of summer, and the tart lemon curd just brings a spot of brightness to my day.

I saw this great Limoncello Tiramisu recipe from Italian Food Forever that I just had to try out. The best part was that there was no need for a sabayon!! No splitting eggs, no whipping egg yolks and sugar over a bain marie, because the lemon curd did that work for you…this was the easiest recipe for tiramisu ever.

This recipe uses limoncello, and because I don’t have a bottle of that at home, I decided to make my own version out of lemon zest and vodka – which is what you’d use in homemade limoncello anyway.

Speedy Limoncello Recipe

You need:
Lemon Zest of 3 lemons
500ml vodka

Soda siphon

IMG_9831

So, inspired by Dave Arnold’s post on rapid infusion, I decided to do a little rapid infusion of my own. Basically the idea is that you put a porous product – in this case, lemon zest – into a siphon with liquid, charge the siphon – I used two chargers of nitrous oxide canisters. What basically happens is that the gas pushes the liquid into the porous item, and the rapid venting pushes all the liquid back out, which completes your infusion. I rested the charged siphon for about 5 minutes before venting, and then rested the vented liquid for about 5 minutes before using.

Super simple limoncello.

IMG_9864

Next, the Tiramisu

Lemon Tiramisu 
Adapted from Italian Food Forever

1 Cup Limoncello Liqueur
1 Cup Water
1/2 Cup Sugar
3/4 Cup Lemon Juice
20 Savoiardi or Lady Finger Cookies (1 Package)

For The Mascarpone Cream:
1 1/2 Cups Cream
1/2 Cup Sugar
1 pot/jar of lemon curd
1 (10 Ounce) Jar Lemon Curd, divided

Bring the liquer, water, sugar and lemon juice to the boil, and reduce slightly.

While the syrup is cooling, mix your mascarpone into the lemon curd. Save some to serve on top of the final dish – I used about 1/2 a pot at this stage. In another bowl, whip the cream and sugar to soft peaks, then fold in your mascarpone and lemon mixture.

Then it’s all an assembly job – roll the savoiardi in the syrup (not too long or they’ll fall apart), lay them in a single layer on your serving dish, lay the mascarpone cream over the top, then repeat the process. Grate some lemon zest over the top and voila! You have an easy, delicious dessert that helps you cling to the memories of summer evenings on the front porch awash in golden setting sunlight.

I served mine with a dollop of lemon curd over the top and some walnut pieces, because I like that crunch.

IMG_9833

You will have some syrup left over, which you can use in other desserts. It also makes for a refreshing summery lemonade when mixed with a little ice and soda water.

Roses and Pearls

IMG_9717

Mother’s day is just around the corner, and it can be hard to find just the right gift. The most common thing to get is a bouquet of flowers – roses, carnations – but I really don’t like the idea of flowers wilting in a vase on the dining table.

So why not an edible bouquet of flowers?

The idea is simple: cupcake base with buttercream frosting piped into a rose. But what kind of cupcake and what kind of buttercream?

Part of the charm of the rose is its glorious smell, and not to mention the flavour. So that’s the butter cream done. And I think Earl Grey cupcakes will go fabulously with it. So…

Earl Grey Chiffon Cupcakes with Rose Buttercream Frosting

[For the Cupcakes]
Adapted from Allrecipes
Makes about 30 cupcakes

7 large eggs, separated.
1 1/2 cups white sugar
1 tsp salt
1/2 cup vegetable oil
3/4 cup cold Earl Grey Tea (Make it a strong one!)
2 tsp vanilla extract
1/2 tsp cream of tartar
1 tbsp baking powder
2 cups sifted cake flour (I used plain)
Cupcake cases, preferably high sided so the chiffon can rise

Preheat your oven to 160C (150C fan forced)

Whip your egg whites, cream of tartar and salt to stiff peaks.

In another bowl, whisk together your egg yolks and sugar till pale. Whisk in your vegetable oil – creating your emulsion – and then slowly add in your cold tea. Mix in your vanilla extract, then fold in your sifted flour and baking powder.

Next – and this is important because you want to retain as much air as possible – add in just a third of your whipped egg whites to the batter to loosen it. Then gently fold in the rest of the egg white mixture, and fill the cupcake cups to 2/3 full.

Bake on a tray till risen and brown. Do not open the oven door for the first 20 minutes, then do the skewer test to see if it’s done. Opening the oven door will cause it to sink and you to have a dense chiffon. Don’t worry if it’s not as airy as you want it though – it still makes a delicious, soft cake!

[For the frosting]
Adapted from My Cupcake Addiction

5 cups Icing Sugar
250g Unsalted Butter
2 tsp Vanilla extract
3 tbsp rose water

Cream softened butter till light and fluffy. It should take on a lighter colour and a slightly pearlescent finish. Aerate that butter!

With the mixer running – or you could do this by hand – incorporate the icing sugar little by little. If you add it all at once, you’ll be coughing up icing sugar because it’s poofed up you’ve breathed it all in. Once it’s completely incorporated and dissolved, mix in the rosewater and vanilla.

Add a couple of drops of red/pink food colouring, and you’re ready to go.

Once the cupcakes are completely cooled, you can just pipe the buttercream frosting on top. Yes, it goes against my cupcake to frosting ratio per bite because buttercream can be a bit heavy, but it’s a special occasion. You could always fill the cupcakes because the chiffon will have a bit of give, but it’s a challenge enough to try and pipe the roses on. (Apparently a Wilton 2D tip is all you need, but it’s out of stock everywhere!!!!)

IMG_9735

As a final touch, I think pearls go very well with roses, and I’ve been very lucky to have conveniently received Queen Soft Sugar Pearls from Beyond the Square.

IMG_9714

The white ones are just perfect for this, and it’s an elegant solution to filling up any gaps on the side of the roses because my piping skills are terrible. I considered using cachous, but they are hard and like jawbreakers, while these taste heaps better.

So go on, bake a few cupcakes and throw a party for Mum!

IMG_9731

Passionfruit Curd Filled Muffins

IMG_9709a

More stuff in the mail! The lovely people from Beyond the Square has sent me more interesting product to try, and this time I’ve got fruit curds from Anathoth! Now I’ve already blogged about their amazing jams, and I’m a big supporter of preserves, because it gives you a little taste of summer when the fruits are no longer in season!

So with the passionfruit curd I thought it might be interesting to make a filled muffin, because I think that provides the best muffin-to-curd ratio with every bite!

Basic Muffin Recipe
Makes 12 regular muffins or 24 mini muffins

1 egg
1/4 cup vegetable or other bland oil
1 cup milk
1/2 cup sugar
2 cups self raising flour

Preheat your oven – 180C for regular sized muffins, 200C for mini muffins

Simply pour the wet ingredients into the dry ingredients, and mix till a batter forms. The batter will be a little lumpy, so don’t succumb to the temptation to keep mixing it till it’s smooth! It’s better to have a slightly lumpy better but a muffin with a beautiful soft crumb.

Simply partially fill the muffin tray with batter (about 1/2 full), then add a heaped teaspoon of passionfruit curd (1/2 tsp for the mini muffins) in the middle – it will sink slightly – and cover with just a little bit of batter to bring the muffin cup to 2/3 full. It may seem lopsided, but the muffin batter will rise around the filling, and the filling tends to sink, so it’s better to have more batter underneath it methinks.

Bake till golden brown on top.

With these filled muffins you can’t exactly do the skewer test, but at those temperatures, I got a crispy top, fluffy insides, with a gooey filling. I much preferred popping the whole warm mini muffins into my mouth, but be careful, because it’s really hot!!

I think it’s great having products like these around during the colder months because I absolutely hate shopping out of season if I can help it, and this gives me the opportunity to have summer flavours, like passionfruit and lemon, during the winter months. And there are so many recipes out there that can provide winter comfort! =)

What are your favourite recipes to use fruit curd in?

Once again, a big thanks to Beyond the Squareand Anathoth for giving me some inspiration for some weekend baking.

Jel-it-in, Queen Fine Foods

Panna Cotta with Chocolate Mousse and Raspberry Compote

I LOVE receiving mail!!! So just imagine my surprise and delight when I received a box of Queen Fine Food’s Jel-it-in!

Jel-it-in

Jel-it-in is a vegetarian alternative to gelatine. Because gelatine is, by definition, made from animal products (you know how really good stocks set into a jelly? It’s thanks to gelatine!), many vegetarians cannot eat it. Imagine life without jelly! Well, besides agar agar as an alternative, which set much harder and more brittle than gelatine and so gives you a different effect, Jell-it-in is made from Carrageenan, which is extracted from seaweed, and locust bean gum, which is a thickener. The reason why it’s a mixture (I think), is because the carrageenan sets slightly harder than gelatine and the thickener gives it a slightly softer finish.

And if you’re not into the science, then I’ve got a tangible experiment to show you!

Panna Cotta Experiment

So. I’ve got two recipes that I’ve tried with Jel-it-in this post: Panna Cotta, and Chocolate mousse. I made a Jel-it-in version and gelatine version and put it side by side. I’m especially excited about the Chocolate Mousse recipe, which I got from a Harvard Lecture by Bill Yosses, executive pastry chef to the White House.

Panna Cotta (makes 3):
3/4 cup milk
3/4 cup cream
1/2 vanilla bean
1/4 cup sugar
4g powdered gelatine (or 4g Jel-it-in)

Bring the milk and the cream slowly to the boil. Open up the vanilla bean and scrape the seeds into the pot, and chuck the pod in to infuse. You need a couple of tablespoons of boiling water to dissolve the gels, and the Jel-it-in actually needs a larger amount of liquid than gelatine and a minimum of about 70C to dissolve. In the case of the Jel-it-in, you might want to heat the milk and dissolve it separately (milk boils at about 90C). Then simply remove the vanilla pods and place into 125ml lightly oiled dariole moulds and set in the fridge. When you’re ready to serve, simply unmould it by inserting a thin knife down the side of the mould to create an air pocket, and tip out the panna cotta.

Chocolate Mousse (altered):

200ml Water
3g gelatine (4g Jel-it-in)
150g 70% cocoa mass dark chocolate (I used Lindt)

Simply heat the water up and dissolve the gelatine in it. Pour the hot water over the dark chocolate and mix till smooth. Put the boil over iced water and use an immersion blender to mix till the mixture cools. The reason why I’d say to use an immersion blender is because you want fine air bubbles within the mixture (it’s still a mousse) and using something like an electric whisk gives you bubbles that are too big. Then simply put the mixture into the fridge and it sets!

The result?

The panna cotta with the Jel-it-in actually gave a slightly softer result than the gelatine! When I cut into the Jel-it-in panna cotta it has a texture reminiscent of silken tofu. If left for a longer period of time it actually weeps moisture gradually. It melted straight on the tongue and gave way to a creamy finish. Now, there is a slight downside. I actually noticed that there was some bits of Jel-it-in that didn’t dissolve properly, and had to strain the mixture. I don’t know whether the softer result was because the dissolution was incomplete – the gelatine dissolved easily and evenly – but either way, my preliminary result shows that the Jel-it-in has a softer result in the panna cotta.

But what about the chocolate mousse? Well it seems that it’s quite the opposite! The chocolate mousse made with gelatine has the softest, lightest, meltiest mousse that has the pure flavour of chocolate. Not that there’s anything wrong with making chocolate mousse the traditional way, but sometimes I just want the pure flavour of 70% chocolate without the added cream. The Jel-it-in chocolate mousse actually mixed and set more easily and thickened up really quickly, but produced a slightly heavier, thicker result.

Panna Cotta with Chocolate Mousse and Raspberry Compote

Either way, I think it’s a great alternative to traditional gelatine. I have many friends who are vegetarian, and I love the extra option of being able to to serve them a gel-set dessert. Some recipes might need a bit of tweaking, but I know I’ll keep experimenting.

Please do let me know if you have recipes that you’ve tried it with! Just leave a comment on the blog or send me an email at insatiablemunchies@gmail.com.

Note: Tammi Kwok of insatiablemunchies was given samples of Queen Fine Foods Jel-it-in by the lovely people at Beyond the Square Communications. 

Queen Make-At-Home Gelato Kits, Part 2

layout 2

From top: Vanilla and Vegemite, Strawberry and Balsamic Glaze swirl

I was recently sent 4 flavours of Make at Home Gelato Kits from the lovely people from Beyond the Square Communications and Queen Fine Foods. But rather than have the usual – straight vanilla, strawberry, chocolate and lemon – I wanted to do something special, something interesting.

To get inspiration for what I wanted to do with the strawberry gelato, I got a punnet of ruby red strawberries – I’m so happy that they’re in season now – and thought about what I’d usually eat with them. Then it clicked. Balsamic Glaze. I absolutely adore strawberries macerated in balsamic vinegar and a sprinkle of sugar, and a glaze would swirl gorgeously into the strawberry gelato.

Reducing the Vinegar

The balsamic glaze is dead simple to make. Simply heat up a cup or so of balsamic vinegar – this is going to reduce by about half, so just double the quantity of however much glaze you’d like to make – until it’s reduced almost to half, then add about a third of a cup of densely packed brown sugar. Continue heating – making sure that the mixture does not burn – until you reach a thick, syrupy consistency.

Strawberries with Balsamic Glaze

And there you go, a dead simple balsamic glaze to add to your strawberry gelato.

Making the gelato was also really easy:

Instructions

I loved the little pictures that came on the back of the box, and it simply involved whisking in your liquid of choice – in this case it could be milk for a gelato or water for a sorbet – and churning it in your ice cream machine of choice.

Whisked away

Ice Cream Churner

It’s a really good idea to make space in your freezer to chill the mixture slightly before churning, just because the little churners with the insulated bowls aren’t always the best at bringing your ice cream all the way. After about 35 min of churning (the machine manufacturers recommend 40 min max) I ended up with this:

Strawberry Gelato

It was slightly thicker than when I first started, but not by much. It provided me just enough thickness to swirl the glaze through, but if I wanted to put anything thicker through, it simply would not have held. As mentioned in the previous post, DO NOT place the ice cream mixture in the churning bowl and leave it to chill in the freezer. The mixture will start freezing solid and you’ll have a real issue getting the paddle of the churner to turn properly. Place the mixture in a bowl and into the freezer for about 20 minutes. Then churn it according to the machine’s instructions.

When you’re done, simply pour it into your freezing container of choice – mine was a one litre capacity plastic container – and swirl the glaze through.

Strawberry Gelato

Then simply cover the ice cream in cling wrap, ensuring that the cling wrap touches all the surface of the ice cream and that there aren’t any air bubbles, put on the lid, and then into the freezer to freeze the rest of the way. The reason that the cling is so important is that the freezer actually dehydrates your food by having the water in your food freeze into ice crystals on the surface, ruining the texture, and causing you to have ‘crunchy’ ice cream.

It also makes your ice cream look like a funky marble watercolour. =)

After leaving it sets in the freezer, simply serve on pancakes with some fresh strawberries, or dig into it with your favourite ice cream topping.

Balmy Strawberries

Only the Vanilla was left, and in my search for interesting sweet/savoury combos I decided to make a leap and try Vanilla and Vegemite. It’s dead simple – after churning the vanilla ice cream, simply swirl in the vegemite. I used vegemite from a squeeze bottle just to make things simpler.

V for Vanilla

I think it’s one of my favourites – the salty, umami flavour of the vegemite complemented the creamy sweetness of the vanilla bean gelato perfectly. Very addictive.

This is absolutely a great easy way to make your own flavour combinations without having to worry about making the ice cream custard etc. Yes, it’s not as flexible as infusing the custard with really cool flavours (I’d love to make a savoury ice cream next with garlic infused cream) but it’s also something easy and creative that you can make on a week night to treat yourself on the weekend.

I’m still treating myself to that rich chocolate gelato. I love salted butterscotch. That is all. Yum.

Note: Tammi Kwok of Insatiable Munchies was given Queen Make At Home gelato kits by the nice people at Queen Fine Foods and Beyond the Square Communications.